Easy Sourdough Bread Bowls Recipe | Crusty & Delicious
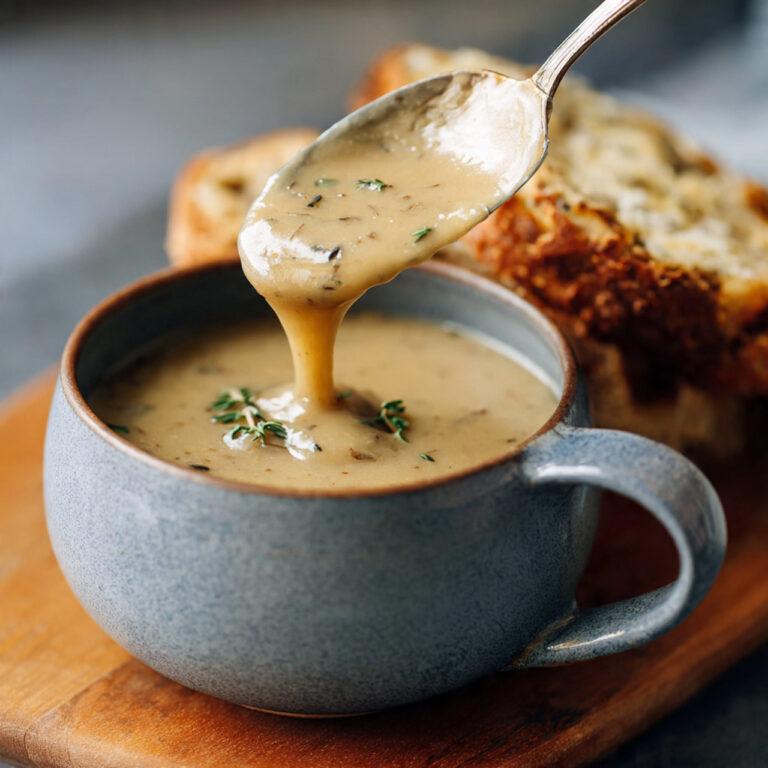
In this article, I’ll walk you through an easy sourdough bread bowls recipe from start to finish. You’ll learn how to make the dough, shape your bowls, bake them to golden perfection, and hollow them out for serving. Whether you’re a seasoned baker or a complete beginner, this step-by-step guide has everything you need to impress at your next dinner table. There’s nothing quite like serving a rich, hearty soup inside a warm, crusty homemade sourdough bread soup bowl. It turns a simple meal into something truly special edible bowl and all!

Ingredients & Substitutions
* To find precise measurements, scroll to the bottom of this post to find the recipe card*
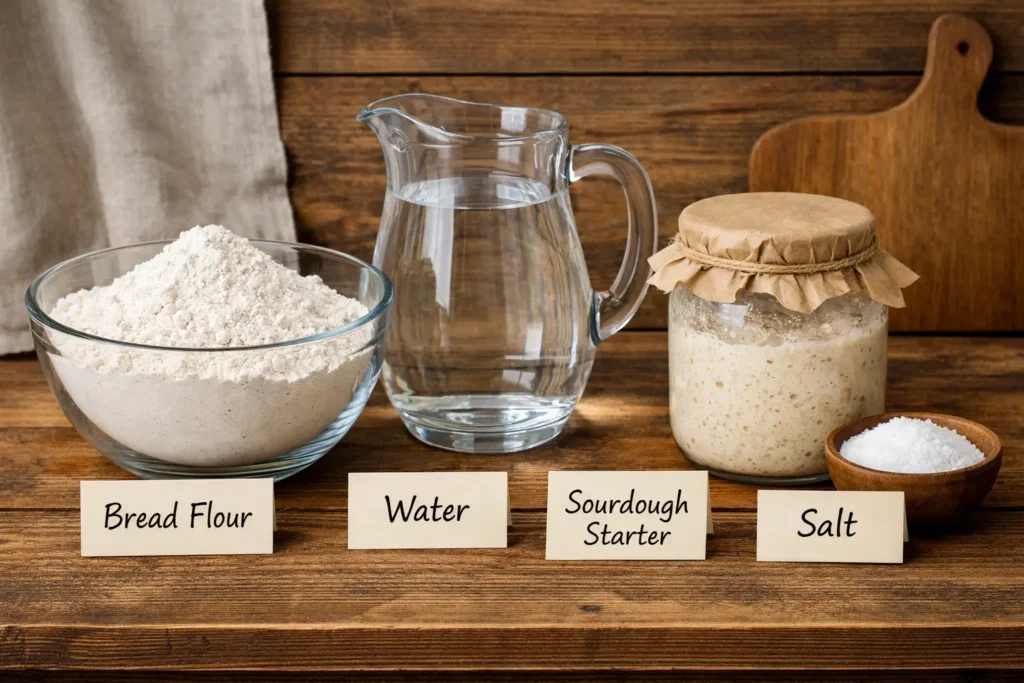
Bread flour: Bread flour is best when it comes to making sourdough bread. The higher protein percentage in flour gives the dough its strength so that it can rise to great heights and give you the best results.
Water: Use room temperature filtered water for consistent results.
Sourdough starter: This recipe calls for an active and bubbly sourdough starter. Salt: Any unrefined salt will do, but my favorite is Redmond’s unrefined salt for some extra minerals.

Supplies
- Large bowl
- Kitchen scale
- Bowl scraper (optional)
- Danish Dough Whisk
- Baking stone / Dutch oven / Baking sheet
- Cast iron skillet
- Parchment paper
- Lame / Razor blade / Sharp knife
- Tea towel, plastic wrap, or what I like to use, a reusable shower cap
Baker’s Schedule #1
DAY 1
9 am: Mix dough
9:45 – 12 pm: Stretch and fold every 45 minutes
4 pm: Cover and place dough in the fridge
DAY 2
12 pm: Shape bread bowls
12:15 pm: Second proof
4:15 pm: Score and bake
This schedule is made for a 68-70 degree F environment. Higher temperatures will quicken the process. Lower temperatures will lengthen the process.
Baker’s schedule # 2
DAY 1
7 am: Mix dough
7:45 – 10 am: Stretch and fold every 45 minutes
2 pm: Shape bread bowls
2:15 pm: Second proof
5:15 pm: Score and bake
This schedule is made for a 68-70 degree F environment. Higher temperatures will quicken the process. Lower temperatures will lengthen the process.
How to Make Sourdough Bread Bowls
Make the dough
In a large mixing bowl, add the active sourdough starter and roo temperature filtered water. Mix with a Danish dough whisk or with your hand until it looks like a milky liquid.
Then, add the bread flour and salt. Again, mix with a whisk or by hand. Be sure to mix until all of the flour is incorporated. The dough will look shaggy, not like a uniform dough ball.
Cover the dough with plastic wrap or a reusable shower cap and let the dough rest for at least 45 minutes before you move on to the next step.
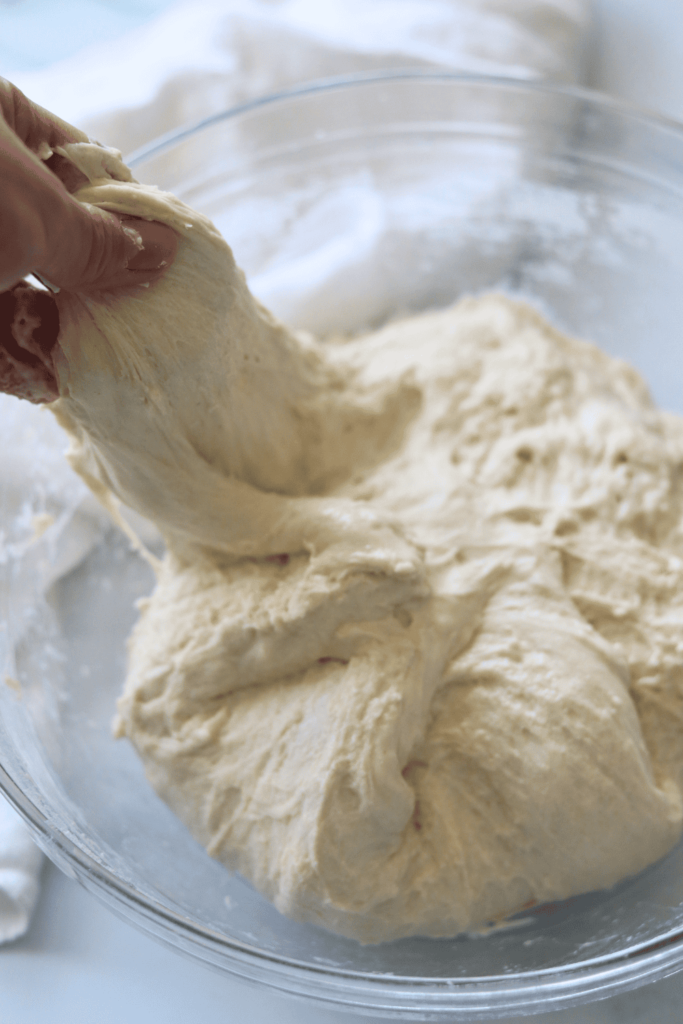
Stretch and folds
With a bowl scraper, scrape the dough away from the bowl.
Now, with slightly wet hands, reach down to the bottom of the bowl, grab a section of the dough and stretch the bread dough above itself. Then fold it over on top of the dough.
Rotate your bowl clockwise a quarter of the way and repeat identical stretch and fold. Repeat the process, about 5-6 times, until you come full circle. You will notice the dough will start to look much smoother than before.
Cover the bowl with plastic wrap or a reusable shower cap and let the dough rest for another 45 minutes.
Repeat the same stretch and folds 3 more times, for a total of 4 sets. Cover the dough and wait for at least 45 minutes of rest in between each set.
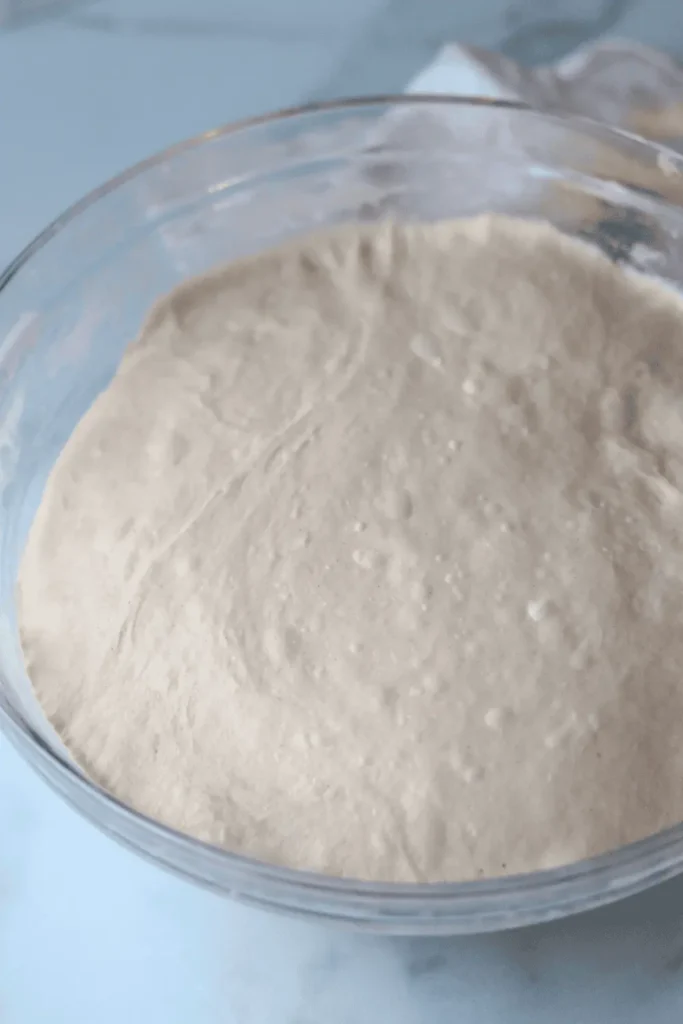
Once you have completed the final set of stretch and folds, cover the dough and let it rest for the remainder of the bulk fermentation. In my 70-degree F kitchen, from mixing the dough to shaping, the bulk fermentation took a total of 6-7 hours.
Bulk fermentation
Now this is the most finicky part of sourdough. There isn’t a set time for your bulk ferment. It is greatly dependent on the temperature of your environment. The warmer it is, the faster your dough will ferment. The opposite is true for cooler temperatures.
In an environment of 70 degrees F, the dough will typically bulk ferment for an additional 3-4 hours after you have completed the final set of stretch and folds.
But again, you will have to look for the signs that your dough is done fermenting, rather than the clock. Warmer temperatures will be faster, while cooler temperatures will be slower.
Here’s what to look for:
- The dough should have increased in size by 75% and be domed on top.
- The dough looks light, and jiggles when the bowl is shaken.
- The dough should easily pull away from the bowl.
- There should be visible bubbles in the dough and on top.
- The dough doesn’t tear when you do a windowpane test
Once the dough has completed the bulk fermentation, you have two options.
If you prefer to bake the bread bowls on the same day, continue to shaping.
If you prefer to bake the bread bowls the following day, cover the bowl with plastic wrap or a reusable shower cap and place the dough in the fridge overnight or up to 48 hours. Remove the dough from the fridge when ready to bake.
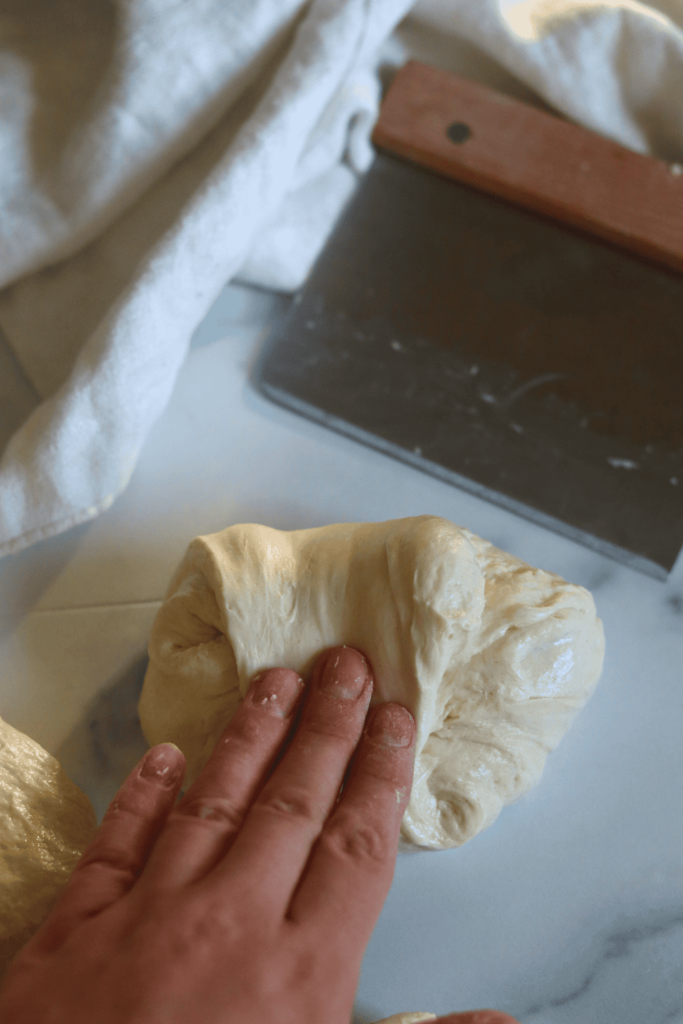
Shape
With slightly wet fingers, gently release the dough from the sides of the bowl. Be careful not to pop all of those lovely bubbles!
Tilt the bowl and leave gravity to do the work to move the dough on the counter.
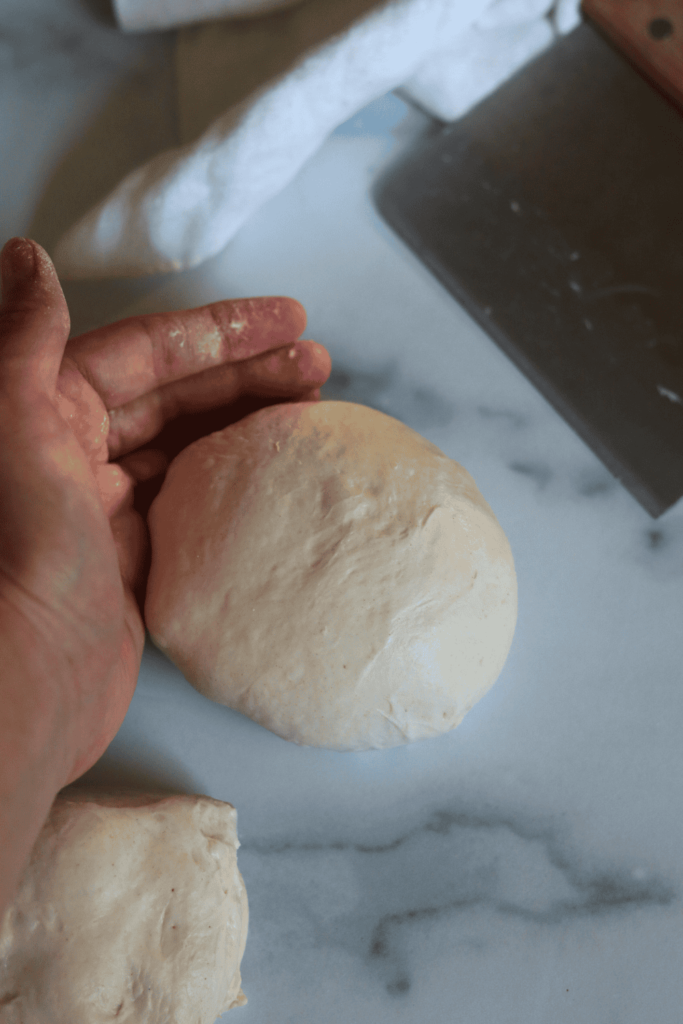
With a bench scraper, divide the dough into 5-6 pieces, about 210-255 grams each.
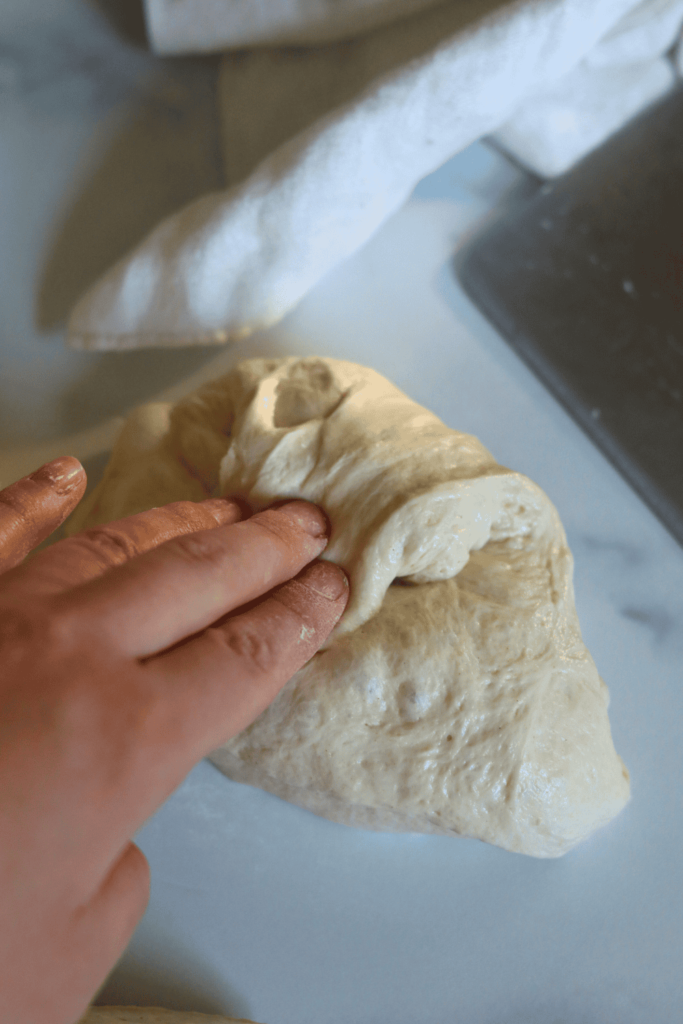
Shape each piece of dough by doing another round of stretch and folds until you have gone full circle.
With a bench scraper or your hands, turn the dough upside down, so the seam is now on the counter. Cup your hands around the dough ball with both hands while rotating the dough counter clockwise to help create tension in the dough and a round shape.
Repeat with the remaining pieces of dough.
Place 3 dough balls each on two pieces of parchment paper and cover with a clean tea towel.
Do not cover with plastic wrap. This keeps the dough very soft, which is harder to score later on.
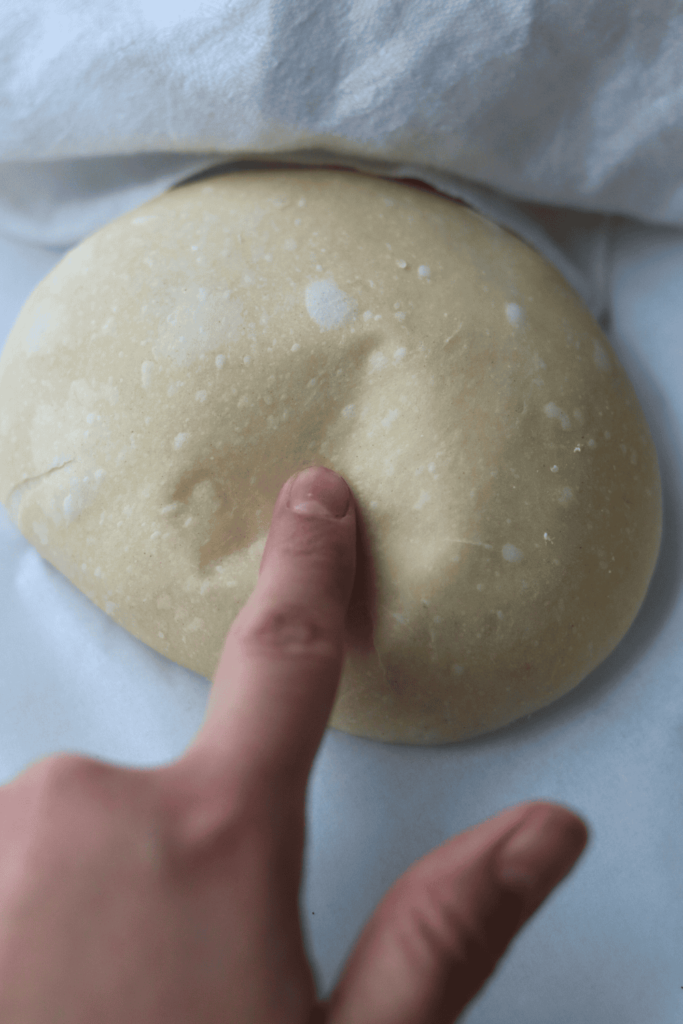
Leave the dough at room temperature until it has doubled in size and the dough doesn’t feel cold anymore. In my 70 degree F kitchen, dough that had been shaped right away took 2-3 hours to double, while dough that had been in the fridge took at least 4 hours to double in size.
Do not rush this step the dough will bake up dense. To test the dough to see if it ready to bake, press a clean finger into the dough. If the dough rises back quickly, it needs longer to proof.
If the dough rises back slowly, leaving a small imprint in the dough, the dough is ready to bake. If the dough does not rise back and the imprint stays, the dough is over proofed.
Score
Thirty minutes before baking, place your baking stone or Dutch oven as well as a cast iron skillet or baking dish in your oven and preheat to 450 degrees F. Allow the baking stone/Dutch oven to preheat for at least 30 minutes.
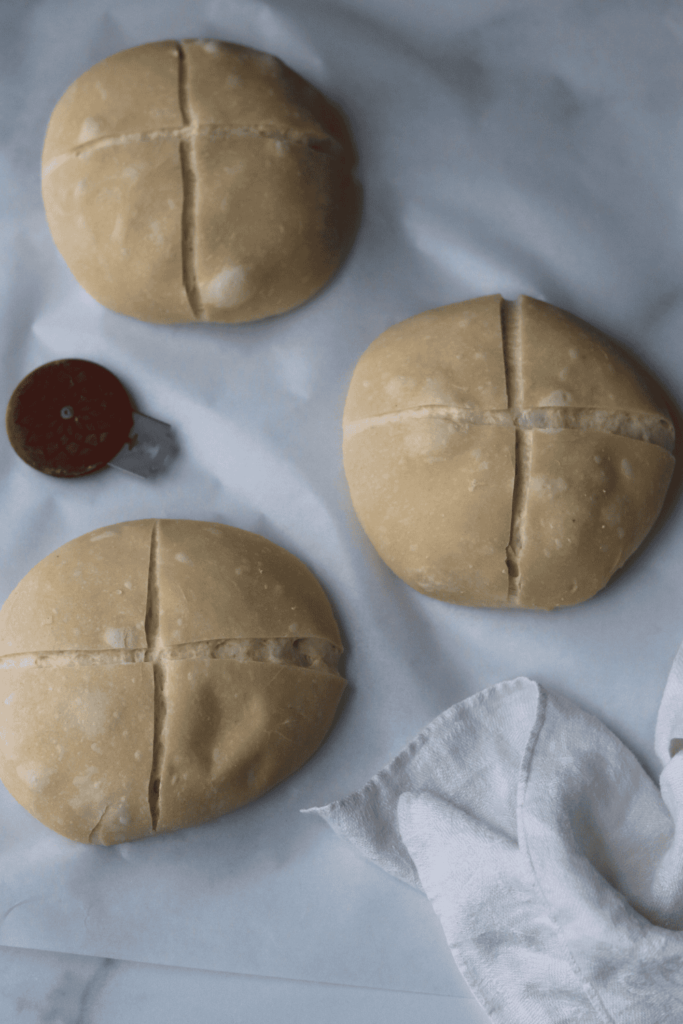
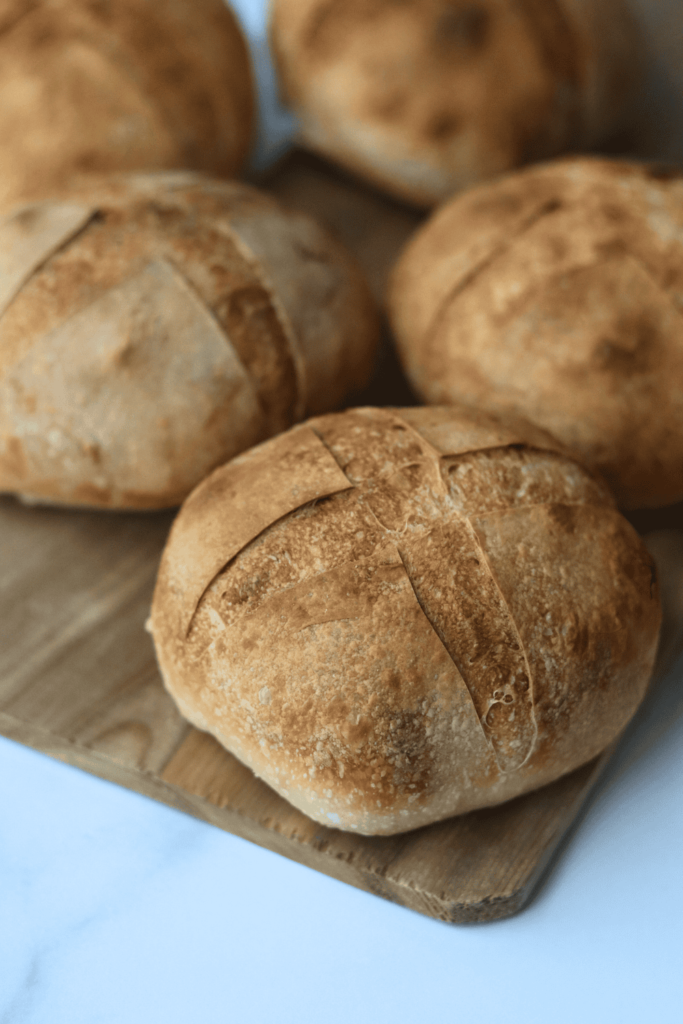
Lightly brush some water on the tops of the bread bowls. With a lame / razor blade or sharp knife, score the letter “X” on top of each dough ball. This is necessary for your bread to be able to expand while baking.
3 Baking Options
If using a baking stone, use a pizza peel and slide the first 3 sourdough bread bowls onto the baking store.
If using a Dutch oven, grab the corners of the parchment paper and carefully place the first 2-3 dough balls into your preheated Dutch Oven and cover with the lid.
If using a baking sheet, slide the parchment paper with 3 dough balls onto the baking sheet.
Place 1 cup of ice cubes into the hot cast iron skillet if you are baking with a baking stone or baking sheet. This is not necessary if you are using a Dutch oven since the lid captures enough steam.
Bake the sourdough discard bread bowls with steam for 20 minutes (if using Dutch oven, bake covered for 20 minutes). After 20 minutes, the ice should have completely evaporated.
Continue to bake the bread bowls for 5-10 minutes or until golden brown (remove the lid of the Dutch oven and continue to bake the bread for an additional 5-10 minutes with the lid off).
Once golden brown, remove the Sourdough Bread Bowls from your oven and place them onto a wire rack to cool.
Repeat the same baking process with the second batch of dough balls, if necessary.
Allow the Sourdough Bread Bowls to cool for at least 1 hour before cutting into it.
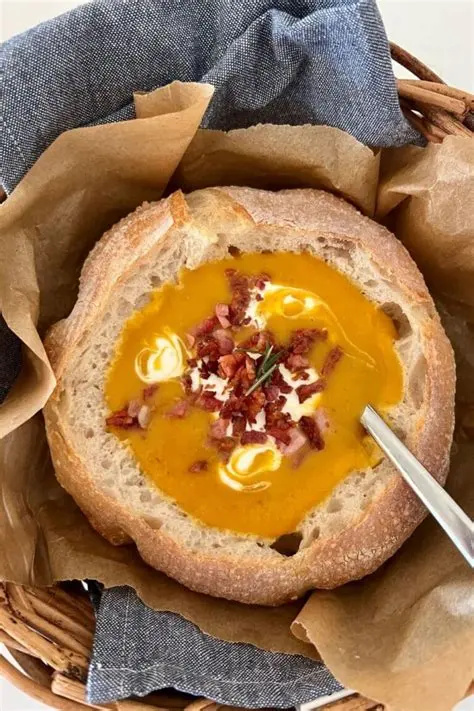
Once cooled, use a serrated knife at a 45 degree angle to slice into the top of each bread bowl. Remove the center of the bread bowl to create a bowl for your soup. Enjoy.
How to Serve:
Sourdough bread bowls are best served slightly warm so the crust stays crisp and the inside feels soft and comforting. Ladle hot soup or stew into the hollowed center just before serving to prevent sogginess. Place the cut out bread lid or extra crumb on the side for dipping. These bread bowls work well for casual family meals or as an eye catching centerpiece for gatherings. Pair them with a simple green salad or roasted vegetables to balance the richness of the soup.
How to Store:
If the Sourdough bread bowls are not filled yet they can be stored at room temperature in a breathable bag or wrapped loosely in a clean kitchen towel for up to one day. For longer storage allow them to cool completely then place them in an airtight bag and freeze for up to three months. When ready to use thaw at room temperature and warm in the oven to refresh the crust. Once filled with soup bread bowls should be eaten immediately and are not suitable for storage.
For More Guidance:
Why You’ll Love This Recipe:
Perfect Comfort Food:
This delightful twist transforms your usual comfort food into a luxury experience, inviting you to savor every bite. The bread absorbs the rich flavors, while the crust offers a satisfying crunch that contrasts perfectly with the smooth soup inside.
Flexible Baking Schedule:
Prepare the dough days in advance and bake the bread loaves when it’s convenient for you. This flexibility allows you to embrace your passion for baking without the stress of strict timelines. If you’re juggling family commitments or a demanding job, this recipe offers the freedom to unleash your inner baker when the moment strikes.
Multiple Baking Options
I tested this recipe to best suit your needs, whether you’re a novice or an experienced baker. My personal preference is to bake it on a baking stone, which gives that perfect crusty exterior while locking in moisture, ensuring every bite is a delight. However, if a baking stone isn’t at your disposal, it also works beautifully on a baking sheet or in a Dutch oven, allowing flexibility for any kitchen setup.
Frequently Asked Questions
Can I make sourdough bread bowls without a starter?
No, a true sourdough bread bowl relies on an active sourdough starter for fermentation and flavor. Without it, the dough won’t rise properly or develop that signature tangy taste. You could use yeast instead, but the texture and flavor will be different.
How long does it take to make sourdough bread bowls?
From start to finish, including fermentation and proofing, expect about 8–12 hours. Much of this time is passive while the dough rises, so active hands-on time is only about 30–40 minutes.
Can I use store-bought sourdough bread instead of making bowls from scratch?
Yes, you can hollow out a round loaf of store-bought sourdough for a quick alternative. Keep in mind that fresh homemade bread has a stronger crust, better structure, and richer flavor.
Why is my bread bowl soggy after adding soup?
This usually happens if the soup sits too long before serving or the bread walls are too thin. To prevent this, serve soup immediately after filling, and leave enough crumb inside the bowl for insulation.
Can I freeze baked sourdough bread bowls?
Yes, unfilled bread bowls freeze well for up to three months. Cool completely, wrap in an airtight bag, and reheat in the oven before serving to restore crispness. Avoid freezing after adding soup.
Warnings:
- Do not overfill: Overfilling the bread bowl with hot soup or stew can cause leaks or spills, which may burn surfaces or skin.
- Hot contents: Soup or stew inside the bread bowl can be very hot; handle carefully to avoid burns.
- Storage caution: Filled bread bowls should be eaten immediately. Storing them after filling can lead to sogginess and bacterial growth.
- Allergies: This recipe contains gluten. Avoid if you have celiac disease or gluten intolerance.
- Starter activity: Using an inactive sourdough starter can result in dense or under-risen bread bowls, which may collapse when filled.
Happy baking!

Sourdough Bread Bowls Recipe
Equipment
- Large bowl
- Kitchen Scale
- Bowl scraper (optional)
- Danish Dough Whisk
- Baking stone / Dutch oven / Baking sheet
- Cast Iron Skillet
- Parchment Paper
Ingredients
- 200 grams heaping 1 cup active sourdough starter
- 425 grams 1 3/4 cups unfiltered water, room temperature
- 630 grams 4 1/2 cups bread flour
- 12 grams 2 teaspoons salt
Instructions
Make the dough
- In a large mixing bowl, add the active sourdough starter and room-temperature filtered water. Mix with a Danish dough whisk or with your hand until it looks like a milky liquid.
- 200g (heaping 1 c) active sourdough starter, 425g (1 3/4 c) unfiltered water, room temperature
- Then, add the bread flour and salt. Again, mix with a whisk or by hand. Be sure to mix until all of the flour is incorporated. The dough will look shaggy, not like a uniform dough ball.
- 630g (4 1/2 c) bread flour, 12g (2 tsp) salt
- Cover the dough with plastic wrap or a reusable shower cap and let the dough rest for at least 45 minutes before you move on to the next step.
Stretch and folds
- With a bowl scraper, scrape the dough away from the bowl. Now, with slightly wet hands, reach down to the bottom of the bowl, grab a section of the dough and stretch the bread dough above itself. Then fold it over on top of the dough.
- Rotate your bowl clockwise a quarter of the way and repeat identical stretch and fold. Repeat the process, about 5-6 times, until you come full circle. You will notice the dough will start to look much smoother than before.
- Cover the bowl with plastic wrap or a reusable shower cap and let the dough rest for another 45 minutes.
- Repeat the same stretch and folds 3 more times, for a total of 4 sets. Cover the dough and wait for at least 45 minutes of rest in between each set.
- Once you have completed the final set of stretch and folds, cover the dough and let it rest for the remainder of the bulk fermentation.
Bulk fermentation
- Now this is the most finicky part of sourdough. There isn’t a set time for your bulk ferment. It is greatly dependent on the temperature of your environment. The warmer it is, the faster your dough will ferment. The opposite is true for cooler temperatures.
- In my 70 degrees F kitchen, the dough will typically bulk ferment for an additional 3-4 hours after you have completed the final set of stretch and folds.
- But again, you will have to look for the signs that your dough is done fermenting, rather than the clock. Warmer temperatures will be faster, while cooler temperatures will be slower.
Here’s what to look for:
- The dough should have increased in size by 75% and be domed on top.
- The dough looks light, and jiggles when the bowl is shaken.
- The dough should easily pull away from the bowl.
- There should be visible bubbles in the dough and on top.
- The dough doesn’t tear when you do a windowpane test
- Once the dough has completed the bulk fermentation, you have two options.
- If you prefer to bake the bread bowls on the same day, continue on to shaping.
- If you prefer to bake the bread bowls the following day, cover the bowl with plastic wrap or a reusable shower cap and place the dough in the fridge overnight or up to 48 hours. Remove the dough from the fridge when ready to bake.
Shape
- With slightly wet fingers, gently release the dough from the sides of the bowl. Be careful not to pop all of those lovely bubbles! Tilt the bowl and leave gravity to do the work to move the dough on the counter.
- With a bench scraper, divide the dough into 5-6 pieces, about 210-255 grams each. Shape each piece of dough by doing another round of stretch and folds until you have gone full circle.
- With a bench scraper or your hands, turn the dough upside down, so the seam is now on the counter. Cup your hands around the dough ball with both hands while rotating the dough counter-clockwise to help create tension in the dough and a round shape.
- Repeat with the remaining pieces of dough.
Second Rise
- Place 3 dough balls each on two pieces of parchment paper, then cover them with a clean tea towel.
- Do not cover with plastic wrap. This keeps the dough very soft, which is harder to score later on.
- Leave the dough balls at room temperature until they have doubled in size and the dough doesn’t feel cold anymore. In my 70 degree F kitchen, dough that had been shaped right away took 2-3 hours to double, while dough that had been in the fridge took at least 4 hours to double in size since the dough was cold.
- Do not rush this step – the dough will bake up dense. To test the dough to see if it ready to bake, press a clean finger into the dough. If the dough rises back quickly, it needs longer to proof.
- If the dough rises back slowly, leaving a small imprint in the dough, the dough is ready to bake. If the dough does not rise back and the imprint stays, the dough is over proofed.
Score
- Thirty minutes before baking, place your baking stone or Dutch oven as well as a cast iron skillet or baking dish in your oven and preheat to 450 degrees F. Allow them to preheat for at least 30 minutes. You can skip this step if you are baking with a baking sheet.
- Once preheated, lightly brush some water on the tops of the bread bowls. With a lame / razor blade or sharp knife, score the letter “X” on top of each dough ball. This is necessary for your bread to be able to expand while baking.
3 Baking Methods
Baking Stone Method
- Use the parchment paper to slide the first 3 sourdough bread bowls onto a pizza peel. Then, slide the parchment paper with the dough balls onto the baking stone. Immediately place 1 cup of ice cubes into the hot cast iron skillet or baking dish. Bake the Sourdough Bread Bowls with steam for 20 minutes. After 20 minutes, the ice should have completely evaporated. Continue to bake the bread bowls for 5-10 minutes or until golden brown.
- Keep the cast iron skillet in the hot oven for the second round.
Baking Sheet Method
- Slide the parchment paper with 3 dough balls onto the baking sheet, then place them into the hot oven. Immediately place 1 cup of ice cubes into the hot cast iron skillet or baking dish. Bake the Sourdough Bread Bowls with steam for 20 minutes. After 20 minutes, the ice should have completely evaporated. Continue to bake the bread bowls for 5-10 minutes or until golden brown.
- Keep the cast iron skillet in the hot oven for the second round.
Dutch Oven Method
- Grab the corners of the parchment paper and carefully place the first 2-3 dough balls into your preheated Dutch Oven and cover with the lid. Bake covered for 20 minutes. Remove the lid of the Dutch oven and continue to bake the bread for an additional 5-10 minutes with the lid off until golden brown.
- Once golden brown, remove the Sourdough Bread Bowls from your oven and place them onto a wire rack to cool.
- Repeat the same baking process with the second batch of dough balls, if necessary.
- Allow the Sourdough Bread Bowls to cool for at least 1 hour before cutting into it.
- Once cooled, use a serrated knife at a 45 degree angle to slice into the top of each bread bowl. Remove the center of the bread bowl to create a bowl for your soup. Enjoy!
Baker’s Schedule #1
DAY 1
- 9 am: Mix dough
- 9:45 – 12 pm: Stretch and fold every 45 minutes
- 4 pm: Cover and place dough in the fridge
DAY 2
- 12 pm: Shape bread bowls
- 12:15 pm: Second proof
- 4:15 pm: Score and bake
- This schedule is made for a 68-70 degree F environment. Higher temperatures will quicken the process. Lower temperatures will lengthen the process.
Baker’s schedule # 2
DAY 1
- 7 am: Mix dough
- 7:45 – 10 am: Stretch and fold every 45 minutes
- 2 pm: Shape bread bowls
- 2:15 pm: Second proof
- 5:15 pm: Score and bake
- This schedule is made for a 68-70 degree F environment. Higher temperatures will quicken the process. Lower temperatures will lengthen the process.