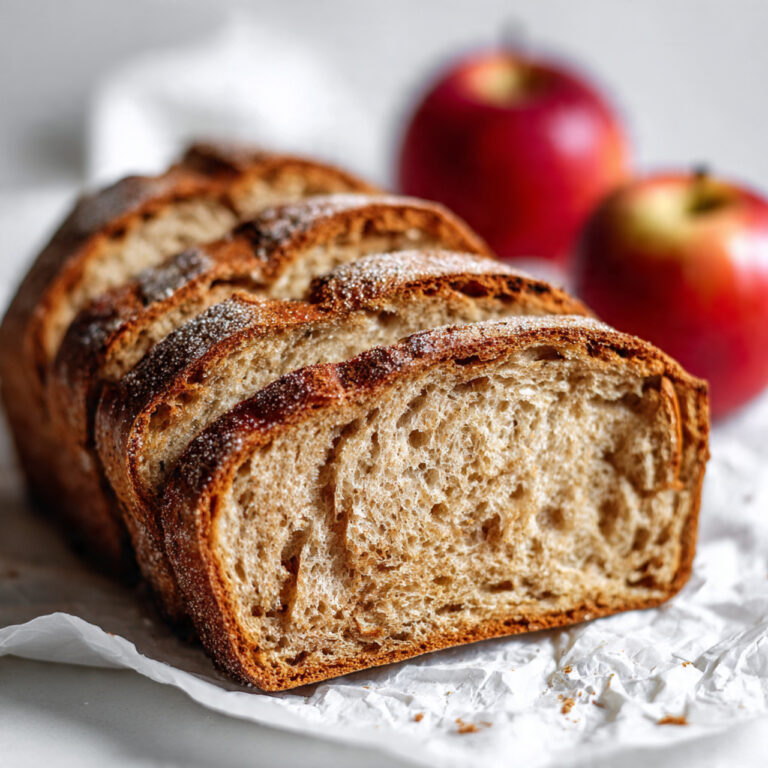
Easy Sourdough Pumpkin Bread Recipe – Moist & Flavorful
Looking for an Easy Sourdough Pumpkin Bread Recipe that puts your discard to delicious use? You’ve found it! This moist, perfectly spiced pumpkin bread combines the tangy depth of sourdough with warm fall flavors in every bite. Whether you’re a sourdough beginner or a seasoned baker, this recipe requires just simple pantry ingredients and minimal effort. In this guide, I’ll walk you through each step from mixing your batter to achieving that golden, tender crumb. Plus, I’ll share tips for customizing your loaf with nuts, chocolate chips, or extra spices. Let’s turn that sourdough starter into your new favorite autumn treat!
Ingredients & Substitutions
* To find precise measurements, scroll to the bottom of this post to find the recipe card*
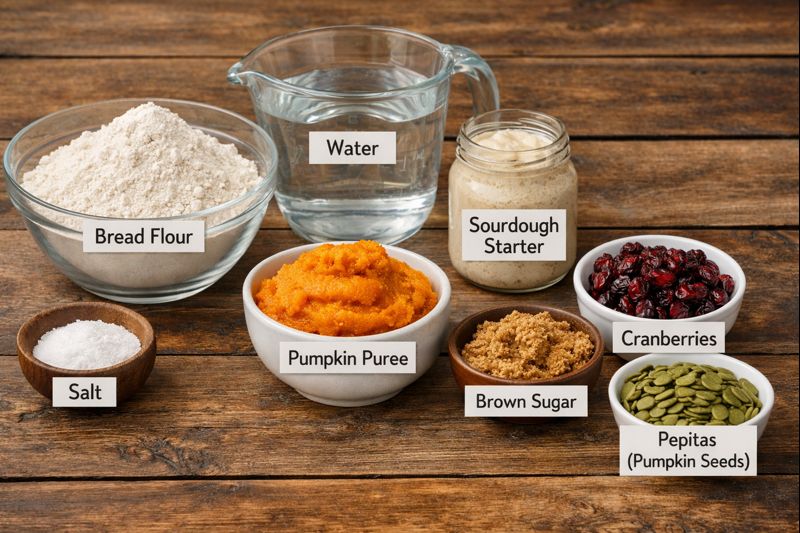
Bread flour: Bread flour is best when it comes to making sourdough bread. The higher protein percentage in flour gives the dough its strength so that it can rise to great heights and give you the best results.
Water: Use room temperature, filtered water for consistent results.
Sourdough starter: This recipe calls for an active and bubbly sourdough starter.
Salt: Any unrefined salt will do, but my favorite is Redmond’s unrefined salt for some extra minerals!
Pumpkin puree: Be sure to use pumpkin puree, not pumpkin pie filling. You may substitute it with homemade pumpkin puree, but you will need to adjust the amount of water, since homemade purees tend to be more watery than store-bought.
Brown sugar: I love the subtle sweetness and richness adding dark brown sugar brings to this fall-like sourdough bread. It isn’t absolutely necessary, but it balances the tart cranberries perfectly. Light brown sugar can be substituted.
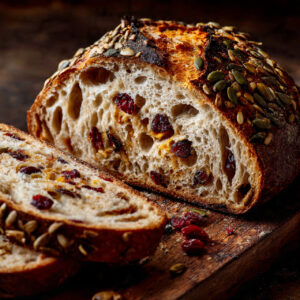
Cranberries: Dried cranberries bring a pop of sweetness, tartness and color to this autumn-inspired loaf.
Pepitas (pumpkin seeds)– Rolling the dough in pepitas not only gives this sourdough bread a stunning finished look, but I love the extra crunchy texture it adds to each bite!

Supplies
Large bowl
Kitchen Scale
Bowl scraper (optional)
Banneton Basket (proofing bowl) or small mixing bowl and tea towel
Danish Dough Whisk
Dutch Oven
Parchment Paper
Lame / Razor blade / Sharp knife
Tea towel, plastic wrap, or what I like to use, a reusable shower cap
Baker’s schedule #1
DAY 1
Feed starter before bed in a 1:4:4 ratio (ex. 10g starter /40g flour /40g water)
DAY 2
9 am: Mix Ingredients
9:30 – 11:30 am: Stretch and fold every 30 minutes
9 pm: Preshape
9:30 pm: Inclusions, shape and place in the fridge
DAY 3
Score and bake in the morning
This schedule is made for a 68-70 degree environment. Higher temperatures will quicken the process. Lower temperatures will lengthen the process.
Baker’s schedule # 2
DAY 1
Feed starter so that it’s active, bubbly, and at its peak (4-12 hours before mixing dough)
8 pm – Mix Ingredients
8:30 – 10:00 pm – Stretch and fold every 30 minutes
DAY 2
8 am – Preshape
8:30 am – Inclusions, shape and place in the fridge
Score and bake in the evening
This schedule is made for a 68-70 degree environment. Higher temperatures will quicken the process. Lower temperatures will lengthen the process.
How to Make Pumpkin Sourdough Bread
Feed Your Sourdough Starter
An active starter can take around 4–12 hours to peak, so adjust to what works best for your environment. This step is crucial for creating the best Sourdough Pumpkin Bread with optimal flavor and texture.
Make the Dough
In a large mixing bowl, add the active sourdough starter, pumpkin puree, brown sugar, and room-temperature filtered water. Mix with a Danish dough whisk or with your hand until it looks like an orange, milky liquid.
Then, add the bread flour and salt. Again, mix with a whisk or by hand. Be sure to mix until all of the flour is incorporated. The dough for your Sourdough Pumpkin Bread will look shaggy, not like a uniform dough ball.
Let the dough rest for at least a half hour before you move on to the next step.
Stretch and Folds
With a bowl scraper, scrape the dough away from the bowl.
Now, with slightly wet hands, reach down to the bottom of the bowl, grab a section of the dough and stretch the bread dough above itself. Then fold it over on top of the dough.
Rotate your bowl clockwise a quarter of the way and repeat identical stretch and fold. Repeat the process until you come full circle. You will notice the Sourdough Pumpkin Bread dough will start to look much smoother than before.
Cover and let the dough rest for another 30 minutes.
Repeat the same stretch and folds 3 more times, for a total of 4 sets. Cover the dough and wait for at least 30 minutes of rest in between each set.
Once you have completed the final set of stretch and folds, cover the dough and let rest for the remainder of the bulk fermentation, about 9-11 more hours if the dough is kept at 68-70 degrees F.
Bulk Fermentation
Now this is the most finicky part of making Sourdough Pumpkin Bread. There isn’t a set time for your bulk ferment. It is greatly dependent on the temperature of your environment. The warmer it is, the faster your dough will ferment. The opposite is true for cooler temperatures.
In an environment of 68-70 degrees, doughs will typically bulk ferment for 9-11 hours more after the stretch and folds, but again, you will have to look for the signs that your dough is done fermenting, rather than the clock. Warmer temperatures will be faster, while cooler temperatures will be slower.
Here’s what to look for:
- The dough should have increased in size by at least 50% and be domed on top.
- The dough looks light, and jiggles when the bowl is shaken.
- The dough should easily pull away from the bowl.
- There should be visible bubbles in the dough and on top.
- The dough doesn’t tear when you do a windowpane test
Pre-Shape
With slightly wet fingers, gently release the Sourdough Pumpkin Bread dough from the sides of the bowl. Be careful not to pop all of those lovely bubbles!
Tilt the bowl and leave gravity to do the work to move the dough onto the counter.
Shape the dough by doing another round of stretch and folds until you have gone full circle.
With a bench scraper or your hands, turn the dough upside down, so the seam is now on the counter. Cover the dough with the bowl and let it rest for 30 minutes.
While you are waiting for the dough to rest, prepare your proofing basket. This can either be a banneton or a small mixing bowl lined with a tea towel. The purpose of this proofing basket is to keep the tight shape that you will create, so make sure you are using a standard bowl that is small enough to help keep the shape.
Dust the banneton or the tea towel with flour (most will say to use rice flour, but I have used just regular all-purpose flour) to prevent sticking.

Final Shape
After 30 minutes of rest, flip the dough, with the seamed side up.
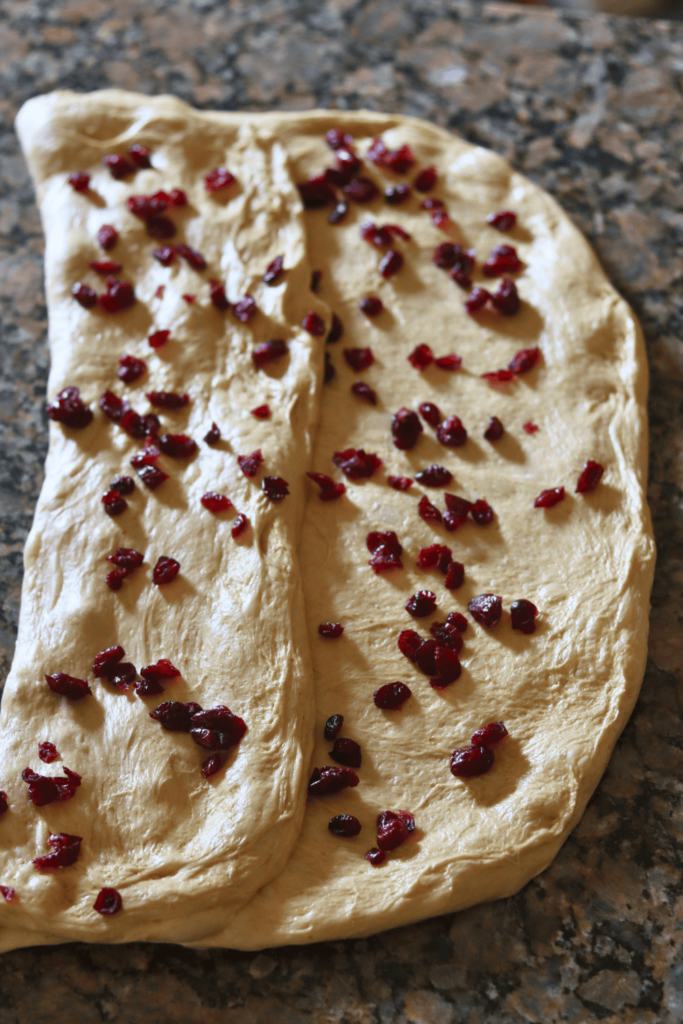
Gently stretch the Sourdough Pumpkin Bread dough into a large rectangle, this is called lamination technique. Refer to the pictures above. Be careful not to stretch any sections of the dough too thinly, as the cranberries will break through.
Sprinkle half of the cranberries over the dough.
Next, take the left side of the dough and fold it towards the middle. Spread 1/2 of the remaining cranberries on top of this new section.
Finally, take the right side of the dough and fold that towards the middle on top of the last section, like a tri-fold. Spread the remaining cranberries on top. Now, roll up the dough, starting with the part of the dough closest to you.
Gently cup your hands around the dough ball. Turn the ball in a clockwise motion about a quarter turn and then softly pull the dough towards you. Do this repeatedly until you see the dough form a tighter and more round shape.
Stop if the dough starts to tear. Some cranberries may pop through the dough, this is okay.
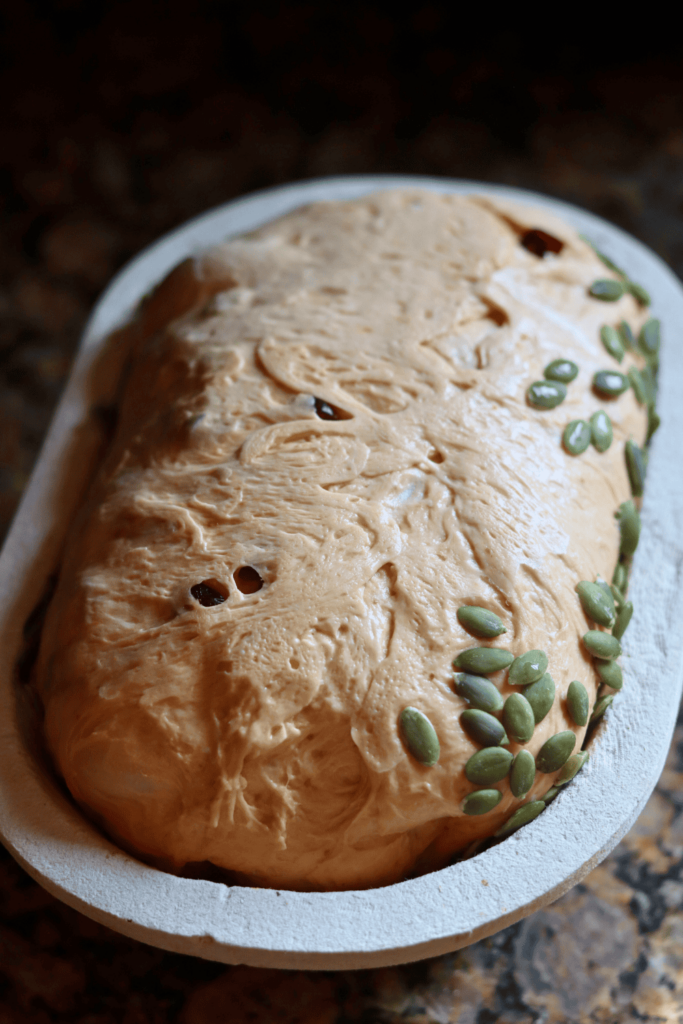
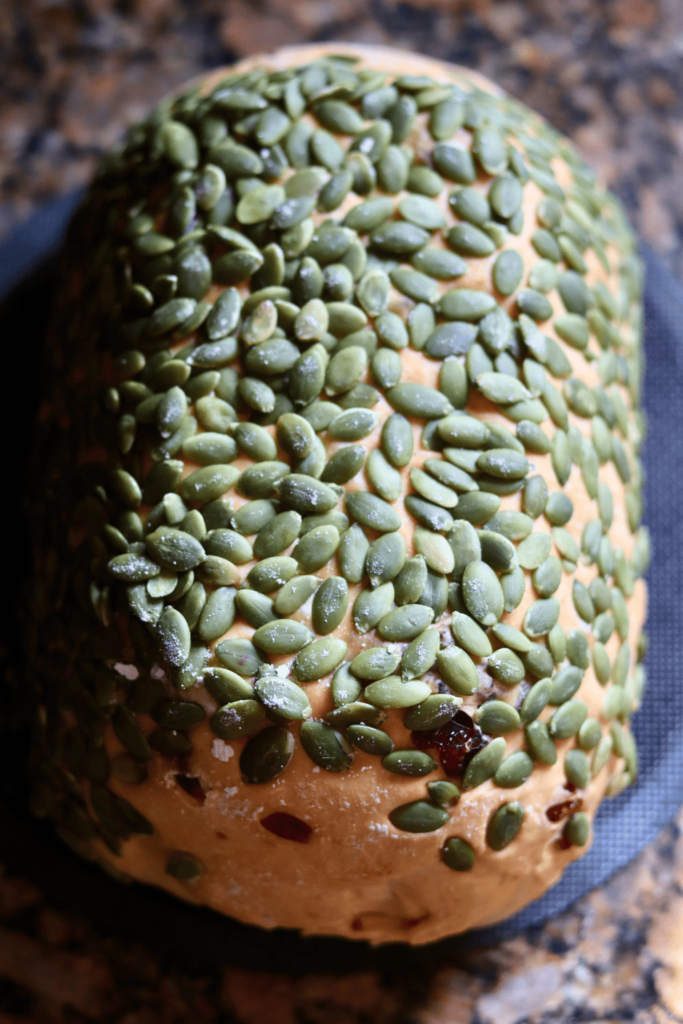
If desired, top the dough with pepitas. To do so, spread out the pepitas on a clean tea towel. Brush the top of the Sourdough Pumpkin Bread dough lightly with some water, then roll the top of the dough on top of the pepitas.
With a bench scraper or just your hands, carefully scoop up the dough and lay it upside down (seed side down) into your floured proofing basket and cover it with a plastic bag or a shower cap.
Cold proof
Place your proofing basket in the fridge to cold proof for 8-72 hours.
Placing your dough in the fridge slows down the fermentation process, which deepens the flavors of your loaf. It also gives you flexibility in when you want to bake your bread.
But don’t wait too long! If left in the fridge for too long, your dough will over-ferment, causing the dough to not be able to rise while baking.
Score
30 minutes before baking, place the dough in the freezer. This helps with the scoring design.
At the same time, place your Dutch oven in your oven and preheat to 500 degrees F. Allow the Dutch oven to preheat for at least 30 minutes.
Place a piece of parchment paper on your workspace and gently flip the banneton upside down over the parchment paper. Since you dusted the banneton, your dough should slowly release and fall onto the parchment paper, landing in the middle with the floured side facing up.
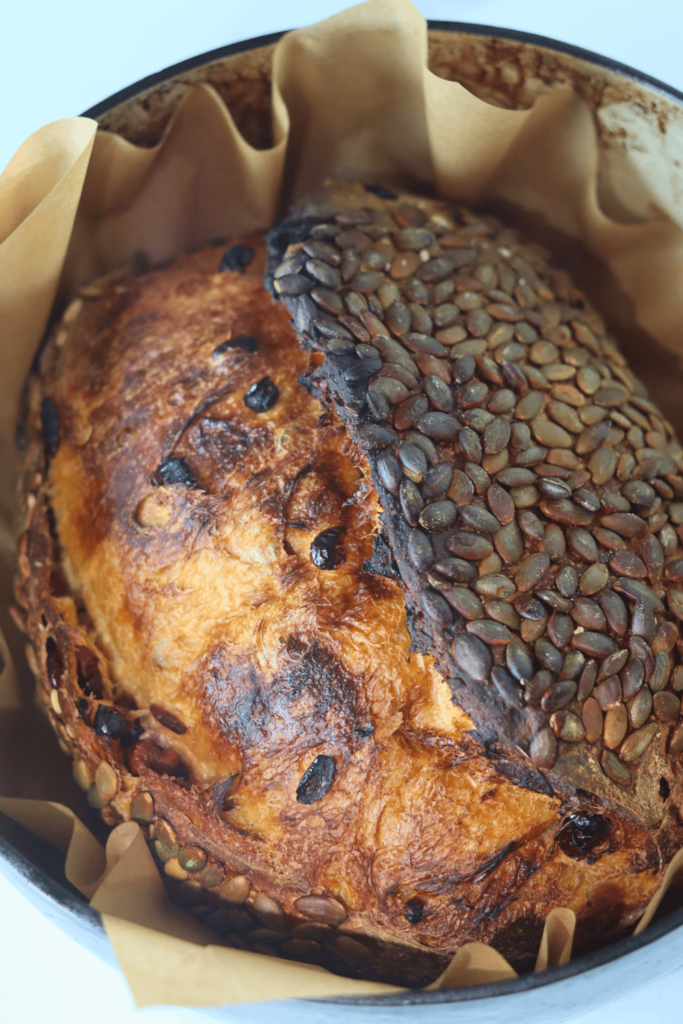
With a lame / razor blade or sharp knife, score a crescent moon shape on top of the dough. Due to the pepitas, intricate scoring will not be possible. This is necessary for your bread to be able to expand while baking.
Grab the corners of the parchment paper and carefully place the Sourdough Pumpkin dough into your preheated Dutch Oven and cover with the lid.
Bake the Pumpkin Sourdough Bread covered for 30 minutes. Then remove the lid of the Dutch oven and continue to bake the bread for an additional 10-15 minutes with the lid off. Keep an eye on the pepitas. If they are browning too much, cover the Dutch oven with aluminum foil while the bread continues to bake.
Once golden brown, remove the Dutch Oven from your oven.
Using the corners of the parchment paper, lift the sourdough bread out of the Dutch oven and place it onto a wire rack to cool.
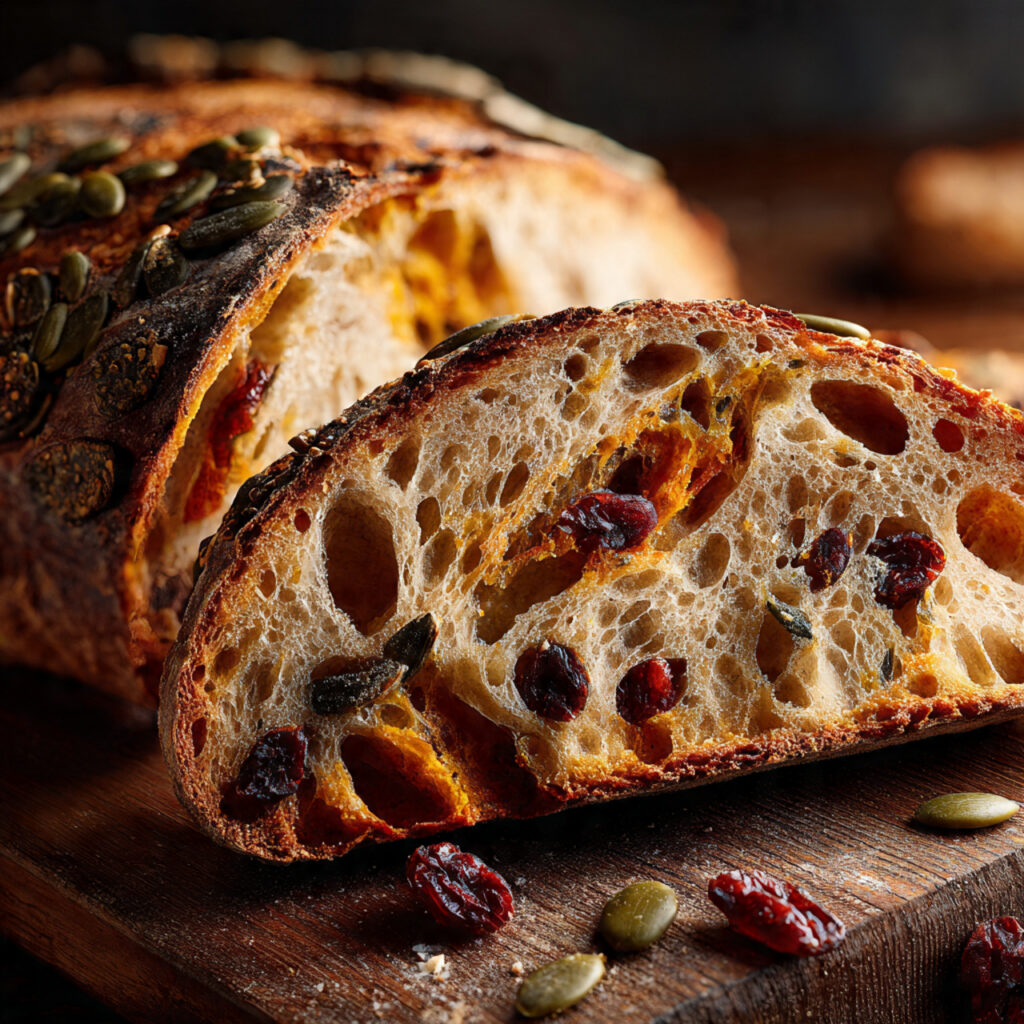
Allow your homemade bread to cool for at least 1 hour before cutting into it. (I know!! How can you possibly wait when it looks and smells so good?! But trust me, if you cut in too soon, your masterpiece will turn mushy and gummy.)
In the meantime, listen to your loaf “sing” its little tune to you with every crinkle and crack.
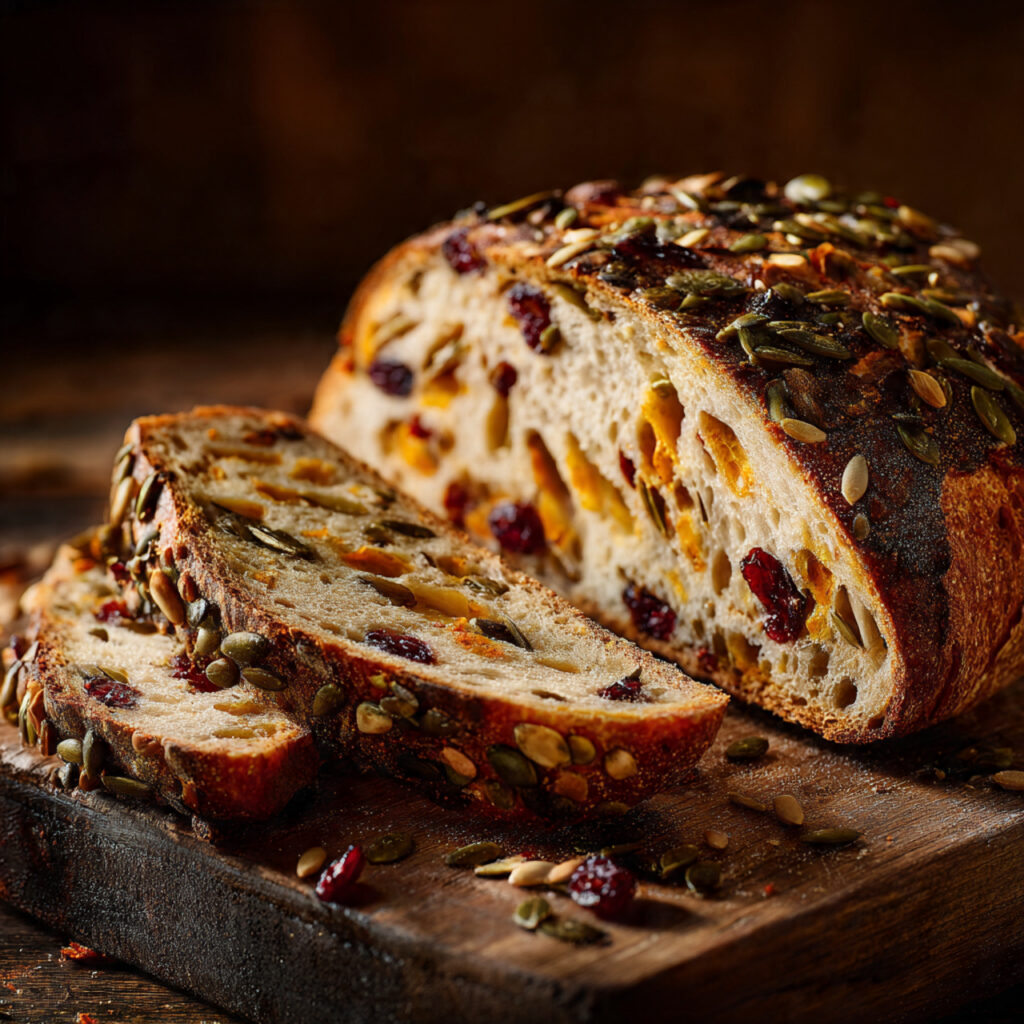
Once the hour is up, slice into your work of art, slather on some salted butter, and enjoy!
How to Serve
Enjoy your Easy Sourdough Pumpkin Bread Recipe warm with salted butter melting into each slice, or slather on cream cheese for extra richness. For breakfast, toast thick slices and top with maple syrup or honey. It pairs beautifully with morning coffee or afternoon tea. Make it dessert-worthy by adding whipped cream or vanilla ice cream, or serve alongside apple cider for a fall brunch spread.
How to Store
Once completely cooled, wrap the loaf tightly in plastic wrap or aluminum foil to lock in moisture. Store at room temperature for up to 3 days it tastes even better the next day as flavors meld. Refrigerate the wrapped bread for up to 1 week for longer storage. To freeze, wrap slices or the whole loaf in plastic wrap, then place in a freezer-safe bag for up to 3 months.
For More Guidance:
Why You’ll Love This Recipe
Flavor
This Easy Sourdough Pumpkin Bread Recipe delivers incredible depth with every bite. The tangy sourdough starter adds complexity that sets it apart from ordinary pumpkin bread, while warm spices like cinnamon, nutmeg, and ginger create that cozy fall flavor you crave. Real pumpkin puree keeps the loaf incredibly moist and tender, and the subtle sweetness balances perfectly with the sourdough’s slight tang for a truly irresistible taste.
Presentation
This pumpkin bread looks as stunning as it tastes with its beautiful golden-brown crust and perfectly domed top. Slice it to reveal a gorgeous orange crumb that’s moist and inviting, studded with warm spice flecks throughout. The rustic, homemade appearance makes it perfect for gifting, holiday gatherings, or simply displaying on your kitchen counter. Dust with powdered sugar or drizzle with cream cheese glaze for an extra-special presentation.
Easy
Don’t let “sourdough” intimidate you—this recipe is beginner-friendly and comes together quickly. You’ll need just one bowl, basic pantry ingredients, and your sourdough discard (no active starter required). Mix everything together, pour into a pan, and bake—no kneading, no complicated techniques, no long rise times. From start to finish, you’ll have fresh-baked bread in about an hour with minimal hands-on effort.
Frequently Asked Questions
Can I use active sourdough starter instead of discard?
Yes, you can absolutely use active sourdough starter in this Easy Sourdough Pumpkin Bread Recipe! Active starter works just as well as discard since this is a quick bread that doesn’t rely on the starter for leavening—baking powder and baking soda handle that job. Using fed starter will give you a slightly more pronounced tangy flavor. Just measure it the same way you would discard, and proceed with the recipe as written without any other adjustments needed.
Can I make this recipe dairy-free or vegan?
This sourdough pumpkin bread adapts easily to dietary preferences! For a dairy-free version, substitute the butter with coconut oil or your favorite plant-based butter, and use non-dairy milk if the recipe calls for any. To make it vegan, replace each egg with a flax egg (1 tablespoon ground flaxseed mixed with 3 tablespoons water, let sit 5 minutes) or use applesauce (¼ cup per egg). The texture may be slightly denser but still delicious and moist.
How do I know when the pumpkin bread is done baking?
Your sourdough pumpkin bread is perfectly baked when a toothpick or cake tester inserted into the center comes out clean or with just a few moist crumbs—no wet batter. The top should be golden brown and spring back lightly when touched, and the edges will pull slightly away from the pan sides. Baking typically takes 50-60 minutes at 350°F, but oven temperatures vary, so start checking around the 45-minute mark to prevent overbaking.
Happy baking!
Sourdough Pumpkin Bread Recipe
Ingredients
- 50 grams heaping 1/4 cup active sourdough starter
- 250 grams about cup filtered, room temperature water
- 175 grams about 2/3 cup pumpkin puree
- 55 grams about 1/4 cup dark brown sugar (can substituted with light brown sugar)
- 500 grams about 3 1/2 cups bread
- 9 grams about 1 1/2 teaspoons salt
- 140 grams about 1 cup dried cranberries *can be omitted
- 160 grams about 1 cup pepitas *can be omitted
Instructions
- I’ve Included 2 sample Baking Schedules below in the notes
- Feed your sourdough starter
- An active starter can take around 4–12 hours to peak, so adjust to what works best for your environment.
Make the dough
- In a large mixing bowl, add the active sourdough starter, pumpkin puree, dark brown sugar, and room-temperature filtered water. Mix with a Danish dough whisk or with your hand until it looks like a orange, milky liquid.
- 50g (1/4 c) starter, 175g (2/3 c) pumpkin puree, 55g (1/4 c) dark brown sugar, 250g (1 c) water
- Then, add the bread flour and salt. Again, mix with a whisk or by hand. Be sure to mix until all of the flour is incorporated. The dough will look shaggy, not like a uniform dough ball.
- 500g (3 1/2 c) bread flour, 9g (1 1/2 tsp) salt
- Let the dough rest for at least a half hour before you move on to the next step.
Stretch and folds
- With a bowl scraper, scrape the dough away from the bowl. Now, with slightly wet hands, reach down to the bottom of the bowl, grab a section of the dough and stretch the bread dough above itself. Then fold it over on top of the dough.
- Rotate your bowl clockwise a quarter of the way and repeat identical stretch and fold. Repeat the process until you come full circle. You will notice the dough will start to look much smoother than before. Cover and let the dough rest for another 30 minutes.
- Repeat the same stretch and folds 3 more times, for a total of 4 sets. Cover the dough and wait for at least 30 minutes of rest in between each set.
- Once you have completed the final set of stretch and folds, cover the dough and lest rest for the remainder of the bulk fermentation, about 9-11 more hours if the dough is kept at 68-70 degrees F.
Bulk fermentation
- Now this is the most finicky part of sourdough. There isn’t a set time for your bulk ferment. It is greatly dependent on the temperature of your environment. The warmer it is, the faster your dough will ferment. The opposite is true for cooler temperatures.
- In an environment of 68-70 degrees, doughs will typically bulk ferment for 9-11 hours more after the stretch and folds, but again, you will have to look for the signs that your dough is done fermenting, rather than the clock. Warmer temperatures will be faster, while cooler temperatures will be slower.
Here’s what to look for:
- The dough should have increased in size by at least 50% and be domed on top.
- The dough looks light, and jiggles when the bowl is shaken.
- The dough should easily pull away from the bowl.
- There should be visible bubbles in the dough and on top.
- The dough doesn’t tear when you do a windowpane test
Pre-shape
- With slightly wet fingers, gently release the dough from the sides of the bowl. Be careful not to pop all of those lovely bubbles! Tilt the bowl and leave gravity to do the work to move the dough on the counter.
- Shape the dough by doing another round of stretch and folds until you have gone full circle. With a bench scraper or your hands, turn the dough upside down, so the seam is now on the counter. Cover the dough with the bowl and let it rest for 30 minutes.
- While you are waiting for the dough to rest, prepare your proofing basket. This can either be a banneton or a small mixing bowl lined with a tea towel. The purpose of this proofing basket is to keep the tight shape that you will create, so make sure you are using a standard bowl that is small enough to help keep the shape.
- Dust the banneton or the tea towel with flour (most will say to use rice flour, but I have used just regular all-purpose flour) to prevent sticking.
Final shape
- After 30 minutes of rest, flip the dough, with the seamed side up. Gently stretch the dough into a large rectangle, this is called lamination technique. Refer to the pictures above. Be careful not to stretch any sections of the dough too thinly, as the cranberries will break through.
- 140g (1 c) dried cranberries
- Sprinkle half of the cranberries over the dough.
- Next, take the left side of the dough and fold it towards the middle. Spread 1/2 of the remaining cranberries on top of this new section.
- Finally, take the right side of the dough and fold that towards the middle on top of the last section, like a tri-fold. Spread the remaining cranberries on top. Now, roll up the dough, starting with the part of the dough closest to you. Gently cup your hands around the dough ball. Turn the ball in a clockwise motion about a quarter turn and then softly pull the dough towards you. Do this repeatedly until you see the dough form a tighter and more round shape. Stop if the dough starts to tear. Some cranberries may pop through the dough, this is okay.
- If desired, top the dough with pepitas. To do so, spread out the peptias on a clean tea towel. Brush the top of the dough lightly with some water, then roll the top of the dough on top of the pepitas. With a bench scraper or just your hands, carefully scope up the dough and lay it upside down (seed side down) into your floured proofing basket and cover it with a plastic bag or a shower cap.
- 160g (1 c) pepitas
Cold proof
- Place your proofing basket in the fridge to cold proof for 8-72 hours. Placing your dough in the fridge slows down the fermentation process, which deepens the flavors of your loaf. It also gives you flexibility in when you want to bake your bread.
- But don’t wait too long! If left in the fridge for too long, your dough will over-ferment, causing the dough to not be able to rise while baking.
Score
- 30 minutes before baking, place the dough in the freezer. This helps with the scoring design.
- At the same time, place your Dutch oven in your oven and preheat to 500 degrees F. Allow the Dutch oven to preheat for at least 30 minutes.
- Place a piece of parchment paper on your workspace and gently flip the banneton upside down over the parchment paper. Since you dusted the banneton, your dough should slowly release and fall onto the parchment paper, landing in the middle with the floured side facing up.
- With a lame / razor blade or sharp knife, score a crescent moon shape on top of the dough. Due to the pepitas, intricate scoring will not be possible. This is necessary for your bread to be able to expand while baking.
- Grab the corners of the parchment paper and carefully place the Sourdough Pumpkin dough into your preheated Dutch Oven and cover with the lid.
- Lower the temperature to 450 degrees F and bake the Pumpkin Sourdough Bread covered for 30 minutes. Then remove the lid of the Dutch oven and continue to bake the bread for an additional 10-15 minutes with the lid off at 425 degrees F. Keep an eye on the pepitas. If they are browning too much, cover the Dutch oven with aluminum foil while the bread continues to bake.
- Once golden brown, remove the Dutch Oven from your oven. Using the corners of the parchment paper, lift the sourdough bread out of the Dutch oven and place it onto a wire rack to cool.
- Allow your homemade bread to cool for at least 1 hour before cutting into it. (I know!! How can you possibly wait when it looks and smells so good?! But trust me, if you cut in too soon, your masterpiece will turn mushy and gummy.)
- In the meantime, listen to your loaf “sing” its little tune to you with every crinkle and crack.
- Once the hour is up, slice into your work of art, slather on some salted butter, and enjoy!