What Does Overproofed Sourdough Look Like? Sign & Fixes
You’ve just checked your sourdough after its final proof, and something feels off. The dough looks different than usual, maybe too flat, overly sticky, or oddly deflated. What does overproofed sourdough look like? Recognizing the telltale signs can mean the difference between a beautiful, airy loaf and a dense disappointment. In this guide, you’ll learn to identify the visual and textural indicators of overproofing, understand why it happens, and discover practical fixes to rescue your dough. Whether you’re a beginner or experienced baker, knowing these warning signs will elevate your sourdough game.
What is Proofing?
Proofing is the fermentation process where your sourdough dough rises and develops flavor, texture, and structure. During this critical phase, the wild yeast and bacteria in your sourdough starter consume sugars in the flour, producing carbon dioxide gas that creates those beautiful air pockets we all love in artisan bread. Proofing occurs in two distinct stages, each playing a vital role in your final loaf’s success.

Bulk Fermentation
Bulk fermentation is the first proofing stage that begins immediately after you finish mixing and kneading your dough. During this phase, the entire mass of dough ferments together in one container, typically lasting 3-6 hours at room temperature. You’ll notice the dough gradually increasing in volume, developing a smooth, elastic texture, and forming visible air bubbles on the surface and sides. This is when gluten strands strengthen and the dough develops its foundational structure and complex flavor profile.
Final Fermentation
Final fermentation, also called the final proof, happens after you’ve shaped your dough into its final form. This stage can take place either at room temperature for 2-4 hours or in the refrigerator overnight for a cold proof (8-48 hours). The dough continues to rise and develop, but now it’s doing so in its shaped form whether that’s in a banneton basket, loaf pan, or on a baking sheet. This final rise is crucial for achieving optimal oven spring and the characteristic open crumb structure that makes sourdough so special.
Signs that Your Sourdough Bread is Properly Proofed
Knowing when your sourdough has reached the perfect proof is essential for baking success. These visual and tactile cues will help you identify when your dough is ready for the oven.
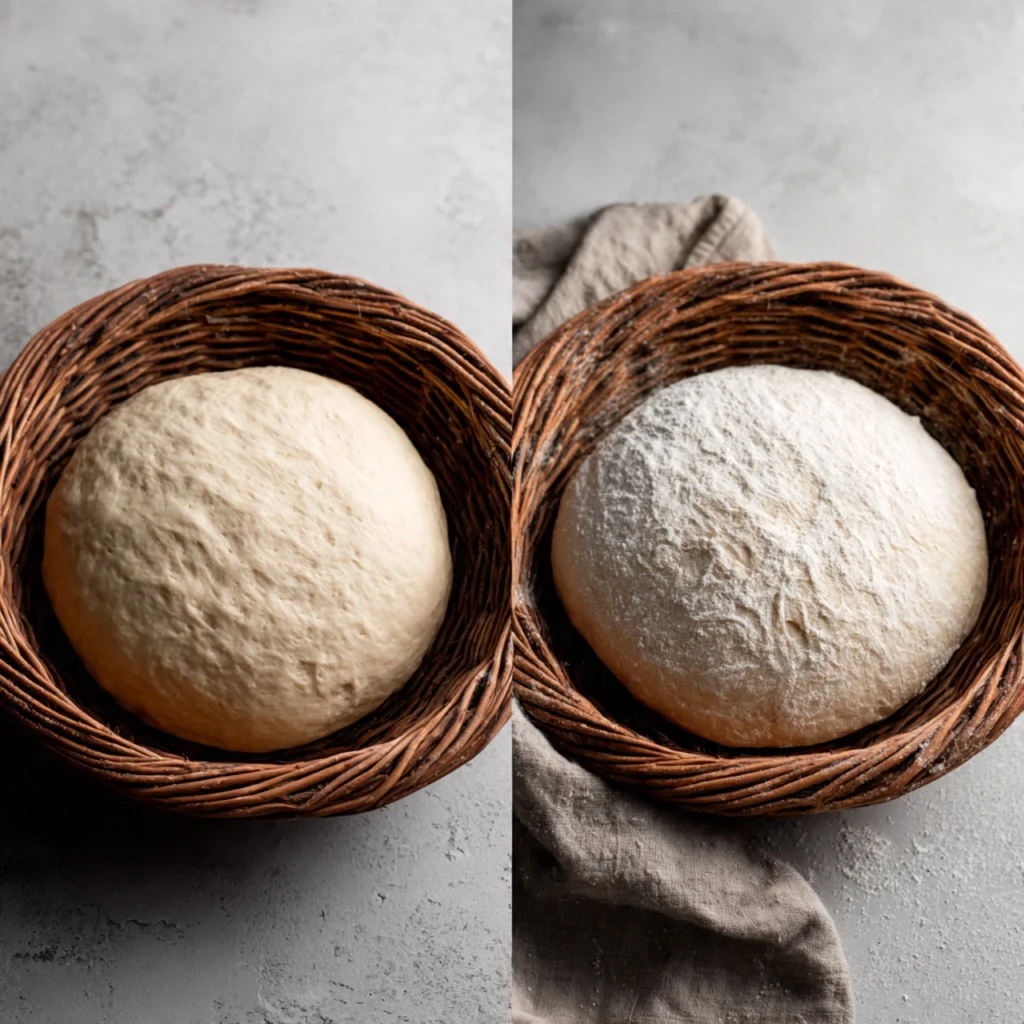
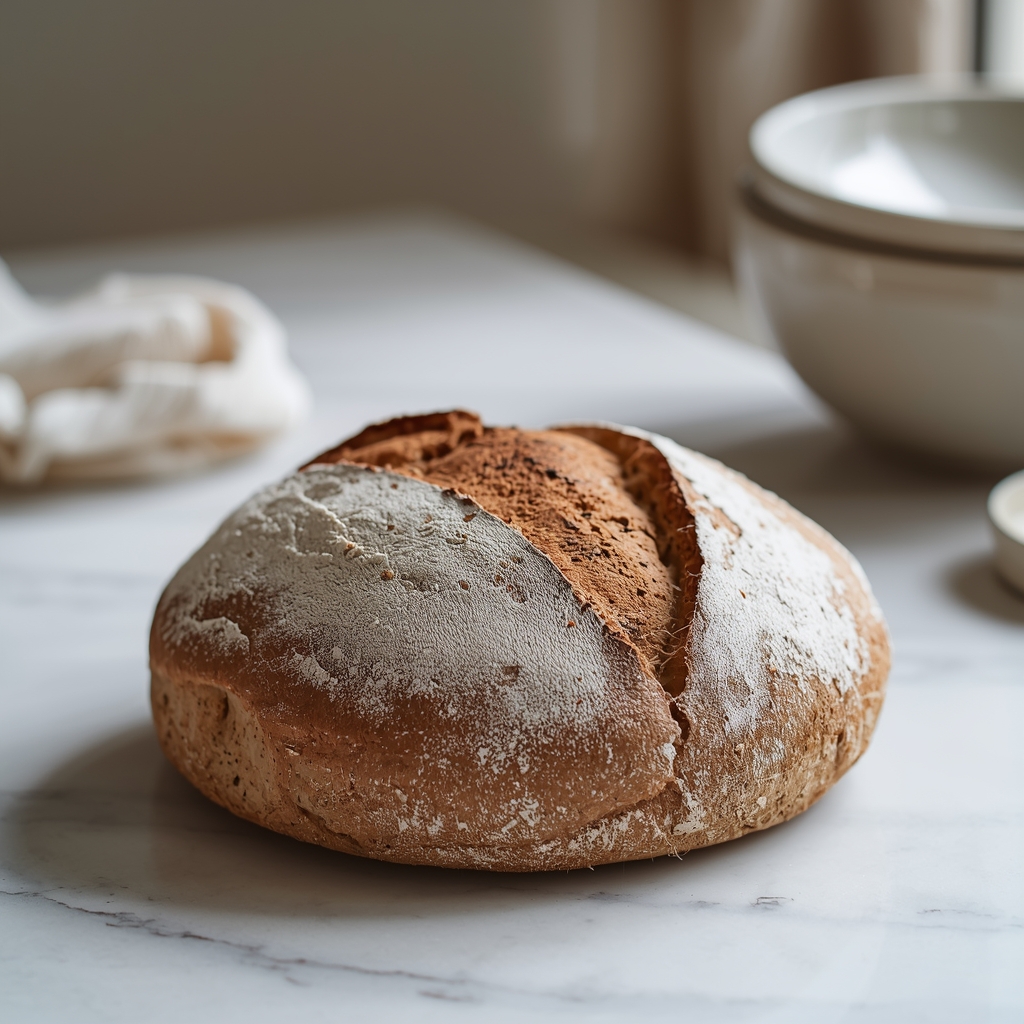
Rounded shape
Properly proofed sourdough maintains a beautifully rounded, domed shape that looks full and alive. The surface appears smooth and taut, with a subtle sheen that indicates the gluten network is properly developed and holding the gases produced during fermentation. When you look at your shaped loaf, it should have gentle curves and a proud, upward lift rather than spreading outward.
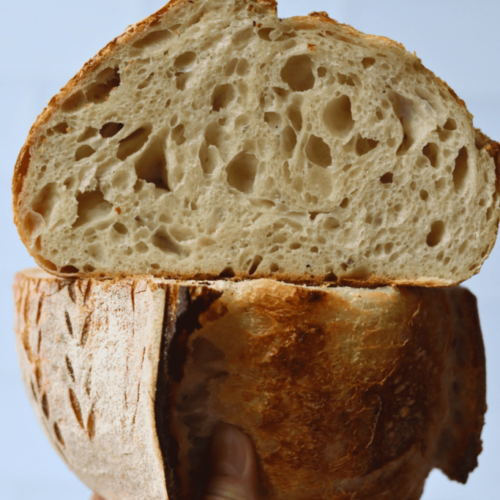
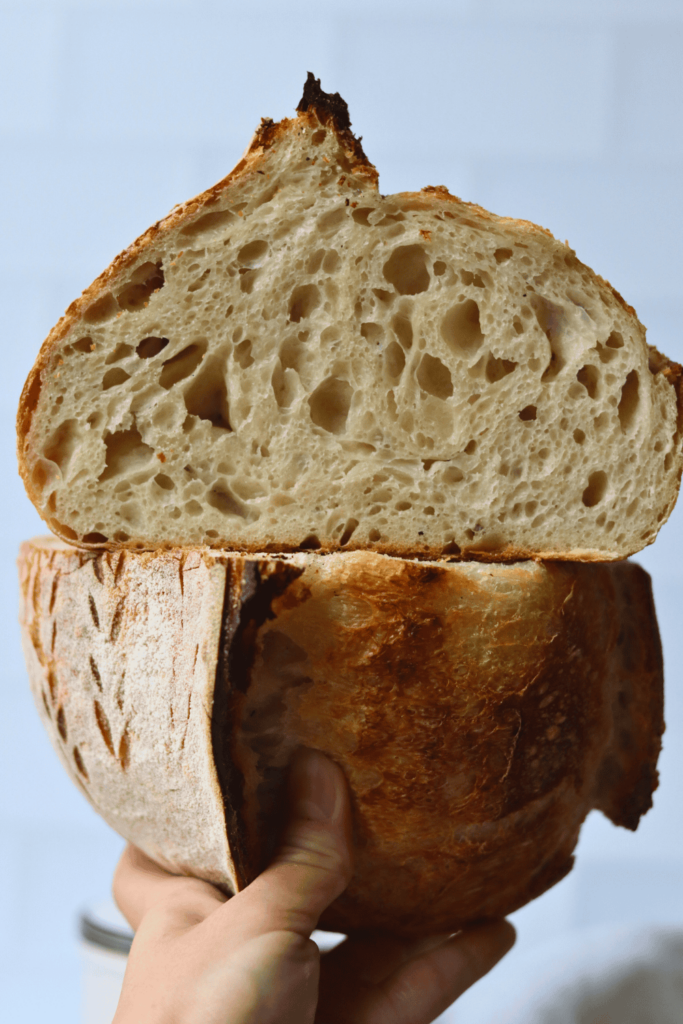
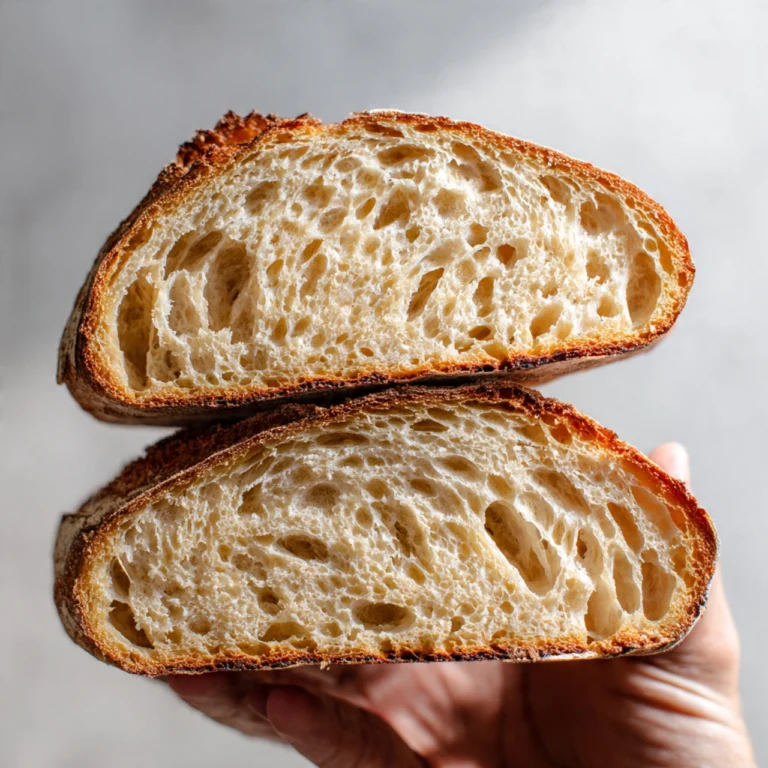
No dense crumb
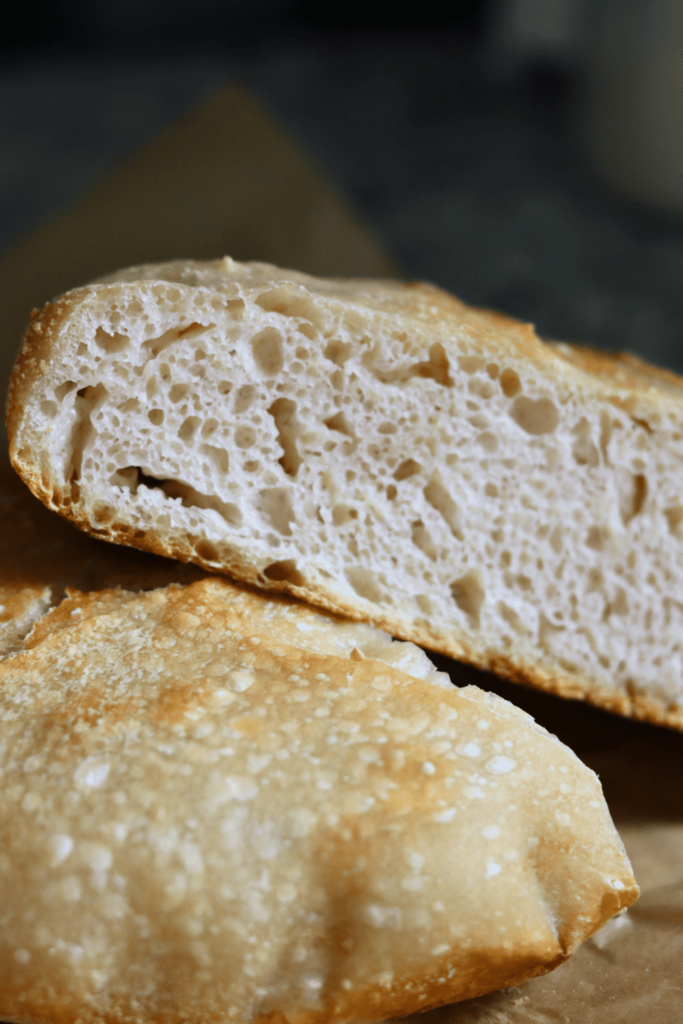
When you slice into a perfectly proofed loaf, the interior crumb should be light and airy with a tender texture that springs back when gently pressed. The bread feels surprisingly light in your hand relative to its size, and each bite has a pleasant, chewy texture without any gummy or doughy sections. This open, well-developed crumb structure is the hallmark of proper fermentation timing.
Consistent holes throughout the crumb
The interior of your bread should showcase an even distribution of air pockets throughout the entire loaf. While some variation in hole size is natural and desirable, you shouldn’t see large gaps clustered in one area with dense sections in another. This consistent hole pattern indicates that fermentation happened evenly throughout the dough, creating a balanced and beautiful crumb structure from edge to edge.
What is Over-Proofed Sourdough?
Over-proofed sourdough occurs when fermentation has gone too far, causing the gluten network to break down and lose its ability to trap the gases produced by yeast and bacteria. Think of it like an overinflated balloon that’s stretched beyond its limit the structure becomes weak and can no longer hold its shape. When dough over-proofs, the proteins that give bread its structure begin to deteriorate from the acidic environment created by prolonged fermentation. The result is dough that collapses easily, lacks strength, and produces bread with poor volume, dense texture, and disappointing flavor that’s often overly sour or acidic.

What Can Affect Your Proofing?
Understanding the variables that influence fermentation helps you control the proofing process and achieve consistent results every time you bake.
Time
Time is the most obvious factor affecting proofing, but it’s not just about following a recipe to the minute. The total fermentation time varies dramatically based on your specific conditions what takes 4 hours in one kitchen might take 8 hours in another. Extended proofing times give microorganisms more opportunity to break down starches and proteins, which enhances flavor development but also increases the risk of over-proofing. Always use visual and tactile cues rather than relying solely on the clock to determine when your dough is ready.
Temperature
Temperature is the single most powerful factor controlling fermentation speed. Warmer environments (75-82°F) accelerate yeast and bacterial activity, causing your dough to proof much faster, while cooler temperatures (65-70°F) slow everything down significantly. A difference of just 5-10 degrees can cut your proofing time in half or double it. This is why many bakers use refrigeration for the final proof it slows fermentation to a crawl, giving you flexibility in your baking schedule while developing deeper, more complex flavors. If you’re making recipes like sourdough sandwich bread or jalapeño and cheddar sourdough bread, pay close attention to your kitchen temperature.
Sourdough Starter
Your starter’s health, feeding schedule, and activity level directly impact proofing speed and quality. A vigorous, well-fed starter at its peak activity will ferment dough much faster than a sluggish or recently-fed starter. The ratio of starter to flour in your recipe also matters using more starter accelerates fermentation while using less slows it down. Additionally, the hydration level of your starter (stiff versus liquid) and the types of flour you feed it will influence how quickly it works through your dough.
What Does Overproofed Sourdough Bread Look Like
Recognizing the visual signs of over-proofing at different stages of the baking process is crucial for diagnosing problems and improving your technique. Let’s examine what over-proofed dough looks like both before and after baking.
Pre-Bake
Before your bread enters the oven, over-proofed dough displays several unmistakable warning signs that experienced bakers learn to recognize immediately.
Large bubbles on the top with a thin membrane
When you look at the surface of over-proofed dough, you’ll notice unusually large bubbles pushing up against a thin, almost translucent membrane of dough. These oversized air pockets form because the gluten structure has weakened and can no longer contain the gas in many smaller bubbles. Instead, gases coalesce into fewer, larger pockets that stretch the dough dangerously thin. If you touch one of these bubbles, it often bursts easily, revealing just how fragile the dough has become.
Sticky/ wet to touch
Over-proofed dough feels excessively sticky and wet, even if you haven’t added extra water to your recipe. This happens because the prolonged fermentation breaks down gluten proteins and starches, releasing moisture that was previously bound up in the dough structure. When you touch the surface, it clings to your fingers more aggressively than properly proofed dough, and you may notice it feels almost slimy or tacky rather than having that pleasant, slightly tacky texture of well-developed dough.
The dough is runny and won’t hold its shape
One of the most frustrating characteristics of over-proofed dough is its complete loss of structure it spreads and flows like thick pancake batter rather than maintaining a cohesive shape. When you try to shape or move it, the dough slumps and puddles instead of holding tension. If you’ve shaped it in a banneton, you might notice it’s spread to fill the entire basket rather than maintaining a domed top. This liquid-like consistency indicates the gluten network has broken down so severely that it can no longer provide structural support.
Scoring tags
When you attempt to score over-proofed dough, the blade drags and tears rather than making clean cuts. The weak gluten structure causes the dough to stick to your lame or knife, and instead of creating defined lines, you end up with ragged, uneven tears. The dough may also deflate noticeably at the slightest touch, and your scoring patterns won’t open up properly during baking because there’s not enough structure left to support expansion.
Scoring spreads open like a book
If you do manage to score over-proofed dough, the cuts immediately spread wide open, flattening out horizontally rather than opening up and out as they should. This happens because the dough has lost its ability to hold tension imagine cutting into an over-filled water balloon. The scoring literally opens like the pages of a book being laid flat, with no upward lift or dramatic ear formation that you’d see in properly proofed bread.
Post-Bake
Even after baking, over-proofed bread reveals itself through several distinctive characteristics that are impossible to miss.
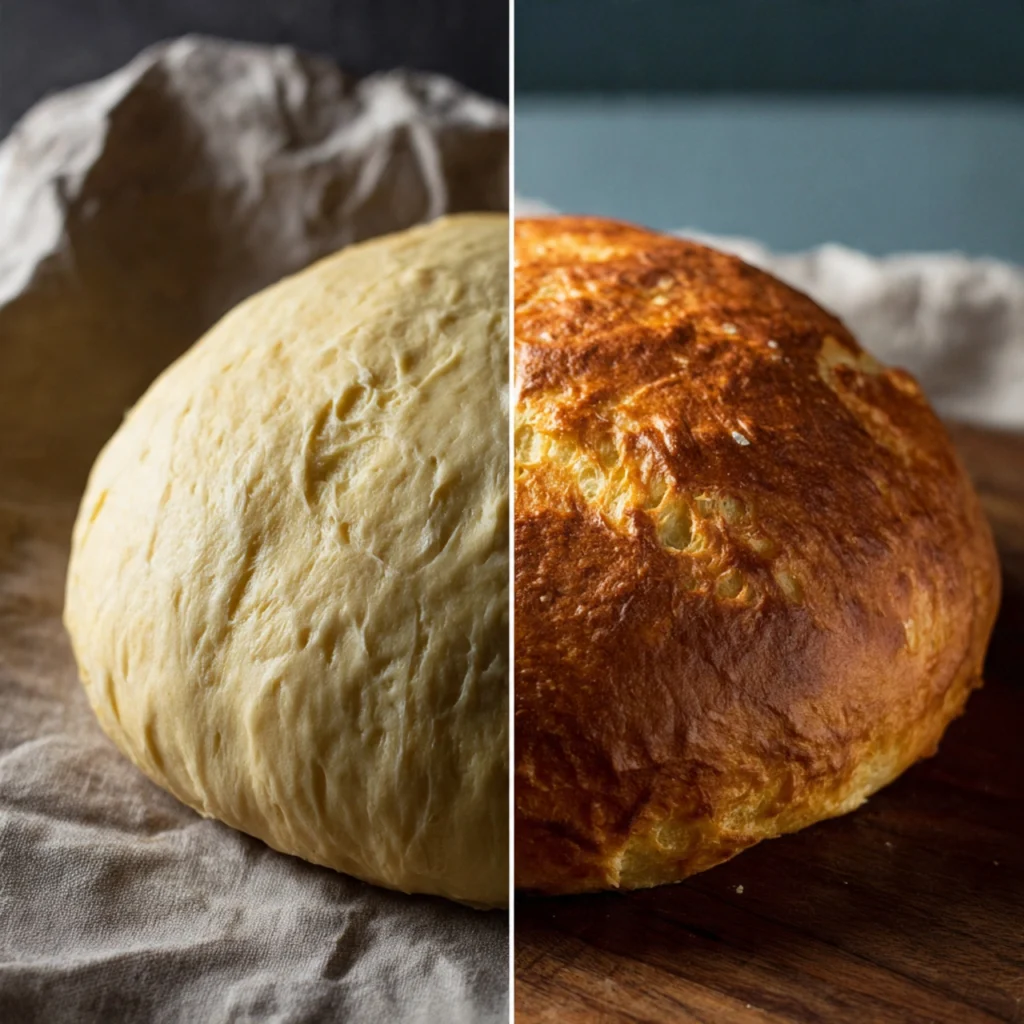
Flat as a pancake
The most obvious sign of over-proofed bread is its disappointingly flat profile. Instead of achieving a beautiful dome with good oven spring, your loaf spreads outward rather than rising upward, resulting in a wide, squat shape that lacks the impressive height and volume you were hoping for. The bread might measure only 2-3 inches tall when it should be 4-5 inches, and this flat appearance immediately signals that something went wrong during proofing.
Dull in color
Over-proofed bread often emerges from the oven with a pale, lackluster crust that lacks the rich golden-brown color and appetizing sheen of properly baked sourdough. This happens because the extended fermentation has consumed most of the sugars that would normally caramelize during baking, creating that beautiful crust color. The surface may look matte and lifeless rather than having a glossy, crackling crust, and any scoring marks will appear pale rather than contrasting beautifully against a darker background.
Crumb is dense and gummy
When you slice into over-proofed bread, the interior crumb tells the whole story it’s tight, dense, and gummy rather than light and airy. The texture feels wet and sticky in your mouth, almost like it’s undercooked even though it’s fully baked. This happens because the collapsed gluten structure couldn’t trap and hold the carbon dioxide produced during fermentation, resulting in a compressed crumb with poor texture. The bread may also taste overly sour or acidic due to the extended fermentation time.
No proper ear
A well-baked sourdough loaf should develop a dramatic “ear” that beautiful raised flap of crust along the scoring line that gives artisan bread its signature look. Over-proofed bread lacks this feature entirely because the weak dough structure can’t support the upward expansion needed to create an ear. Instead, your scoring lines remain flat or even sink below the surface of the crust, leaving you with a smooth, featureless top that lacks the visual drama of properly proofed sourdough.
Scoring is stretched and wide
The scoring marks on over-proofed bread appear stretched out and abnormally wide, sometimes spanning several inches across the top of the loaf. These openings lack depth and definition, looking shallow and flat rather than deep and dramatic. This stretching occurs because the dough had so little structure that it spread outward during baking rather than expanding upward, pulling your carefully placed scores into wide, unattractive gaps.
Small holes with raggy edges
Instead of the beautiful, irregular holes with smooth, shiny walls that characterize good sourdough crumb, over-proofed bread has numerous tiny holes with rough, torn-looking edges. The crumb structure appears shredded or stringy rather than having clean, defined air pockets. This ragged appearance results from the deteriorated gluten network that tore apart during fermentation rather than stretching gracefully to accommodate expanding gases.
Ways to Test for Over-proofed Sourdough Bread
Don’t wait until you pull your bread from the oven to discover it was over-proofed. Use these reliable testing methods to assess your dough’s readiness before baking.

Poke Test
The poke test is the most reliable and widely-used method for determining whether your sourdough is under-proofed, properly proofed, or over-proofed. Simply press your floured finger gently into the dough about half an inch deep, then observe how the dough responds. This simple test reveals everything you need to know about your dough’s structural integrity and readiness for baking.
Underproofed Dough
When you poke under-proofed dough, the indentation springs back almost immediately and completely, leaving virtually no visible mark within a few seconds. The dough feels tight, taut, and resistant to your finger, almost like poking a firmly inflated ball. This quick recovery indicates the gluten network is still very strong and the dough hasn’t produced enough gas yet. Under-proofed dough needs more time to ferment before baking give it another 30-60 minutes and test again.
Properly Proofed Dough
Perfectly proofed dough responds to the poke test with a slow, gentle spring back that fills in about halfway. The indentation remains partially visible for 5-10 seconds before gradually diminishing but not completely disappearing. The dough should feel soft and pillowy but still maintain some resistance and structure. This Goldilocks response not too fast, not too slow indicates your dough has reached optimal fermentation and is ready for scoring and baking.
Overproofed Dough
Over-proofed dough responds to the poke test with little to no spring back at all your finger impression remains fully visible and may even continue to slowly expand or deflate. The dough feels soft and fragile, lacking the resistance and bounce of properly proofed dough. In severe cases, the surface may tear or collapse when you press it, and you might notice the entire loaf deflating slightly from just this gentle test. If your dough shows these signs, it’s too late to save it as a traditional loaf, but you can still transform it into focaccia or other flatbreads.
How to Rescue Over-proofed Dough
Don’t throw away that over-proofed dough! While you can’t turn it back into a perfect boule, you can absolutely transform it into delicious baked goods that work with, rather than against, its loose structure.

These are a few options that you can choose to transform your over-proofed dough into:
When your dough has gone too far, embrace recipes that celebrate a wetter, more extensible dough rather than fighting against it. These alternatives will help you avoid waste and still produce something delicious from your baking efforts.
Focaccia
Focaccia is the perfect solution for over-proofed sourdough because it’s supposed to have a flat, open structure with large, irregular holes. Simply press your dough into a well-oiled baking pan, dimple the surface with your fingertips, drizzle generously with olive oil, add your favorite toppings (rosemary, cherry tomatoes, garlic, olives), and bake until golden. The wet, loose consistency that ruined your bread dough creates the exact texture you want in focaccia crispy on the outside, light and airy on the inside. You can also try variations like sourdough ciabatta rolls which embrace a similar wet dough style.
Pizza Crust
Over-proofed dough makes surprisingly excellent pizza crust because the weakened gluten structure actually makes it easier to stretch thin without springing back. Divide your dough into individual pizza-sized portions, stretch or roll each one into a thin round, and top with your favorite sauce, cheese, and toppings. The extended fermentation has developed complex flavors that will shine through in your finished pizza, and the crispy, charred crust will disguise any textural issues you’d notice in bread. Bake at high heat (450-500°F) for the best results.
Flatbread
Transform your over-proofed dough into rustic flatbreads by dividing it into smaller portions and rolling or stretching each piece into thin rounds or ovals. Cook them in a hot skillet, on a griddle, or directly on a baking stone for a few minutes per side until you see beautiful charred spots and the bread puffs up. These flatbreads work wonderfully for wraps, dipping into hummus or olive oil, or serving alongside soups and stews. The loose dough structure creates tender, pliable flatbreads rather than tough ones.
Tortillas
Sourdough tortillas are having a moment, and your over-proofed dough is actually ideal for this purpose. Divide the dough into small balls (about 2 ounces each), let them rest for 10 minutes, then roll each one paper-thin using a well-floured rolling pin. Cook in a hot, dry skillet for about 30 seconds per side until you see brown spots forming. These tortillas will be soft, pliable, and have a wonderful tangy flavor from the sourdough fermentation. They’re perfect for tacos, quesadillas, or breakfast burritos.
Sourdough Tips & Techniques
Ready to expand your sourdough repertoire and avoid over-proofing in the future? Check out these delicious recipes and helpful techniques:
- Master the basics with our sourdough sandwich bread recipe for everyday baking
- Try seasonal variations like sourdough pumpkin bagels or easy sourdough pumpkin bread
- Explore sweet treats with sourdough apple cider donuts or apple cider sourdough donut quick bread
- Get creative with sourdough pumpkin coffee cake or sourdough masala chai bread
- Use up your discard with sourdough discard apple cinnamon quick bread
Frequently Asked Questions
Can you fix overproofed sourdough dough?
Unfortunately, you cannot reverse overproofing once the gluten structure has broken down. However, you can absolutely rescue overproofed dough by transforming it into recipes that work with its loose, wet consistency rather than against it. The best options include focaccia, pizza crust, flatbread, or tortillas—all of which embrace a more relaxed dough structure and will still taste delicious despite the extended fermentation. Simply reshape your dough for your chosen alternative recipe and proceed with baking. While you won’t get a traditional sourdough boule, you’ll avoid waste and still enjoy the complex flavors developed during fermentation.
What happens if you bake overproofed sourdough?
If you bake overproofed sourdough, you’ll end up with a flat, dense loaf that lacks the beautiful rise and open crumb structure you expect from artisan bread. The bread will spread outward rather than rising upward, resulting in a pancake-like shape with poor volume. The crust will be pale and dull instead of golden-brown, and the interior crumb will be gummy, dense, and overly acidic in flavor. You’ll notice the scoring marks spread abnormally wide with no proper ear formation, and the texture will feel wet and sticky in your mouth rather than light and airy. While the bread is still safe to eat, it won’t have the appealing texture or appearance of properly proofed sourdough.
How long should I proof my sourdough to avoid overproofing?
There’s no universal time for proofing sourdough because it depends entirely on your specific conditions—temperature, starter strength, dough hydration, and flour type all play crucial roles. At room temperature (68-72°F), bulk fermentation typically takes 4-6 hours and final proof takes 2-4 hours, but warmer kitchens (75-80°F) can cut this time in half. Instead of relying on the clock, use the poke test to determine readiness: properly proofed dough springs back slowly, filling the indentation about halfway in 5-10 seconds. Many bakers prefer cold-proofing in the refrigerator (36-40°F) for 8-48 hours during final fermentation, which slows the process dramatically and gives you more control and flexibility. Always trust visual and tactile cues over time—watch for a 50-75% volume increase, visible air bubbles, and a soft, pillowy texture.