Easy Sourdough Crescent Rolls Recipe
Transform your sourdough discard into buttery, flaky Easy Sourdough Crescent Rolls that will have everyone reaching for seconds. This simple recipe combines the tangy depth of sourdough starter with the tender, pull apart texture of classic crescent rolls no laminating or complicated techniques required. Whether you’re looking for a delicious way to use extra sourdough starter or want to elevate your dinner table with homemade rolls, these golden, crescent shaped beauties come together with minimal effort and deliver maximum flavor.
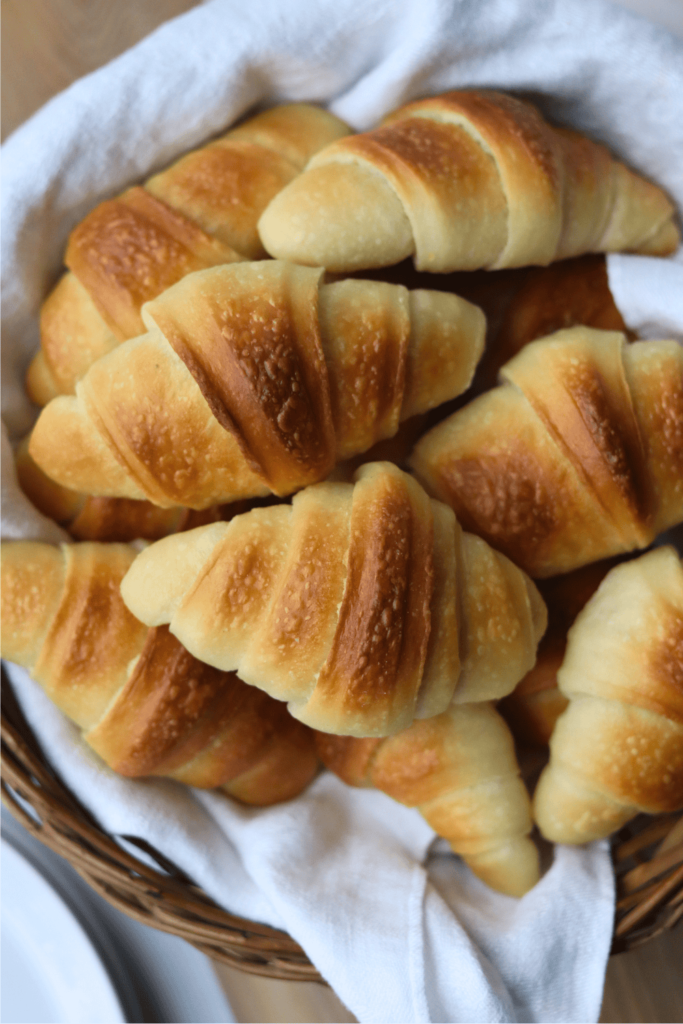
Perfect for holiday meals, weekend brunches, or alongside your favorite soup, these sourdough crescent rolls prove that baking with natural yeast can be both approachable and absolutely delicious. Ready to create bakery worthy rolls in your own kitchen? Let’s get started.
Ingredients & Substitutions
* To find precise measurements, scroll to the bottom of this post to find the recipe card*


Milk: Creates a softer, more tender sourdough crescent roll.
Butter: Use melted, unsalted butter. If using salted butter, omit ¼ teaspoon of salt from the recipe.
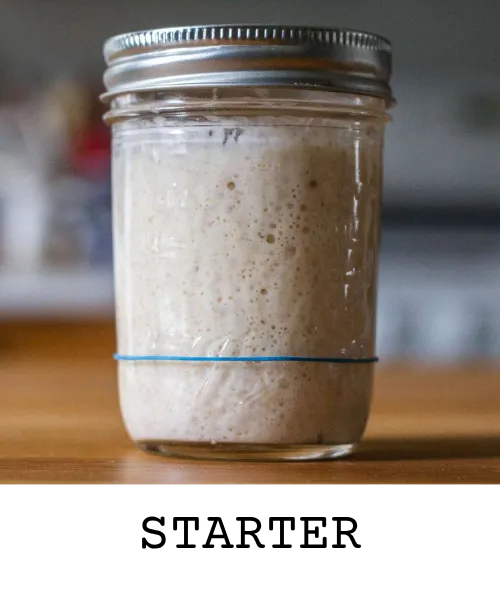
Sourdough starter: Active and bubbly sourdough starter helps this dough rise.
Sugar: Just a hint of sweetness in these rolls. Cane sugar or honey can be used as a substitute. Use the same amount in grams.
Egg: Brings structure and softness to the dough.
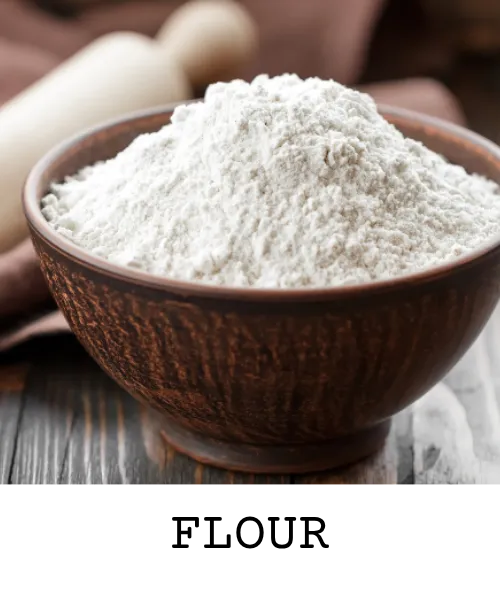
Bread flour: For the best possible rise, I highly recommend using bread flour, however, all purpose flour can be substituted 1:1.
Salt: For a bit of contrast!

Supplies
Stand Mixer or large mixing bowl
Kitchen scale
Pizza cutter
Pastry brush
Baking sheet
Baking sheet cover
Baker’s Schedule
Same Day Bake
10 am: Make dough
10:30 am: Knead Dough
10:45 am: Continue Bulk Fermentation
2:45 pm: Shape
3 pm Second Rise
5 pm: Bake
This schedule is made for a 68-70 degree environment. Higher temperatures will quicken the process. Lower temperatures will lengthen the process.
Two-Day Bake
5 pm: Make dough
5:30 pm: Knead Dough
5:45 pm: Continue Bulk Fermentation
9:45 pm: Shape & Place in Fridge Overnight
Next Day
2 pm Second Rise
6 pm: Bake
This schedule is made for a 68-70 degree environment. Higher temperatures will quicken the process. Lower temperatures will lengthen the process.
How to Make Sourdough Crescent Rolls
Make the Dough
Heat the butter and milk in a small saucepan on the stove or in a small bowl in the microwave until warm, but no warmer than 110 degrees F. If the liquid is hotter than 120 degrees F, it can kill the sourdough starter, which will prevent the dough from rising.
Meanwhile, add the bubbly sourdough starter, egg, and sugar to the bowl of a stand mixer with a paddle attachment. Mix on low speed until combined, then gradually add the warm milk and melted butter.
This can also be done by hand.
To the wet ingredients, add the flour and salt and mix again on low speed. Stop to scrape the sides of the bowl to incorporate all the dry ingredients, and then continue to mix on low for 1-2 minutes.
The dough will look thick and sticky, like a cake batter. Cover with plastic wrap, a tea towel, or what I like to use a reusable shower cap and allow the dough to rest for 30 minutes. This allows the gluten to rest before kneading.
Knead
After 30 minutes, remove the cover and knead the dough on medium speed with the dough hook attachment for 15 minutes.
This can also be done by hand. Knead for the same amount of time, or until the dough passes the windowpane test.
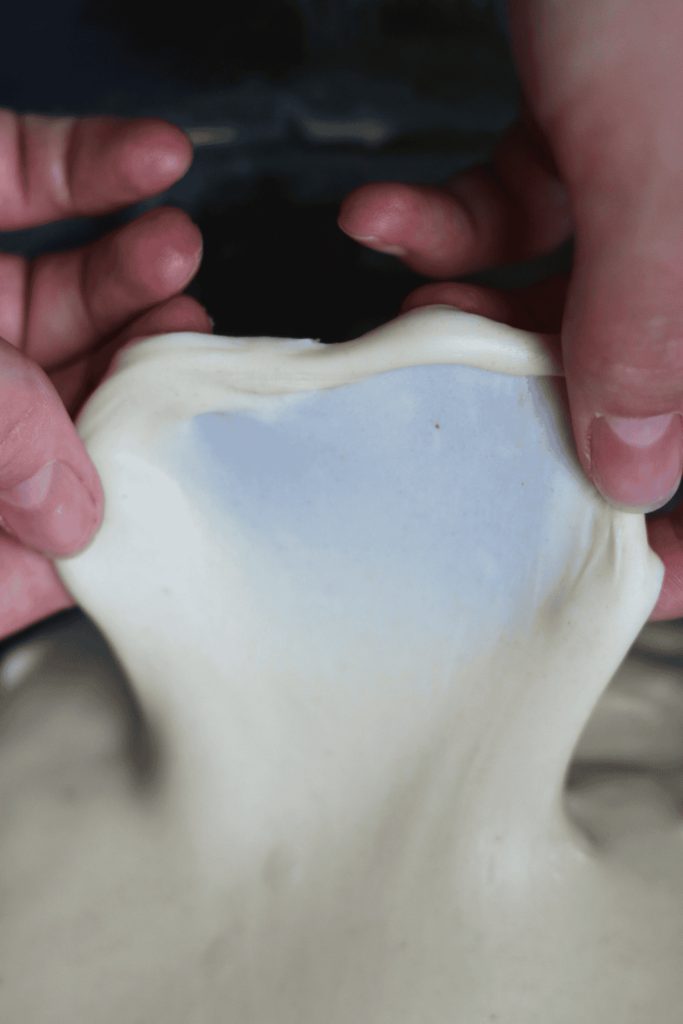
You’ll know the dough has been kneaded completely when it is smooth and shiny. The dough will completely pull away from the sides of the bowl when it is being kneaded and it will pass the windowpane test.
Baking Tip: This means when you stretch a small section of dough into a thin film, the light will be able to pass through without the dough tearing. If this is accomplished, the dough has been properly kneaded.
Remove the dough and place it in a lightly greased bowl. I like to use butter or olive oil. Cover it again.
Bulk Fermentation
Place the dough in a warm place in your kitchen. In my 70-degree F kitchen, the first proof takes about 3-4 hours. Note that the bulk fermentation time greatly depends on the temperature of your kitchen. If you have a colder kitchen, the rise time will take longer. If your kitchen runs warm, the first rise will take less time.
A warm spot may be on top of your refrigerator, in a cabinet, or in an OFF oven with the light on.
Shape
Once the dough has doubled in size, punch the top of the dough to remove all the air bubbles. Then, place the dough on a lightly floured work surface. Divide the dough equally in half, then roll each into a round dough ball.
Cover with a clean tea towel and leave the dough to rest for 10 minutes: this allows the gluten to relax before rolling.
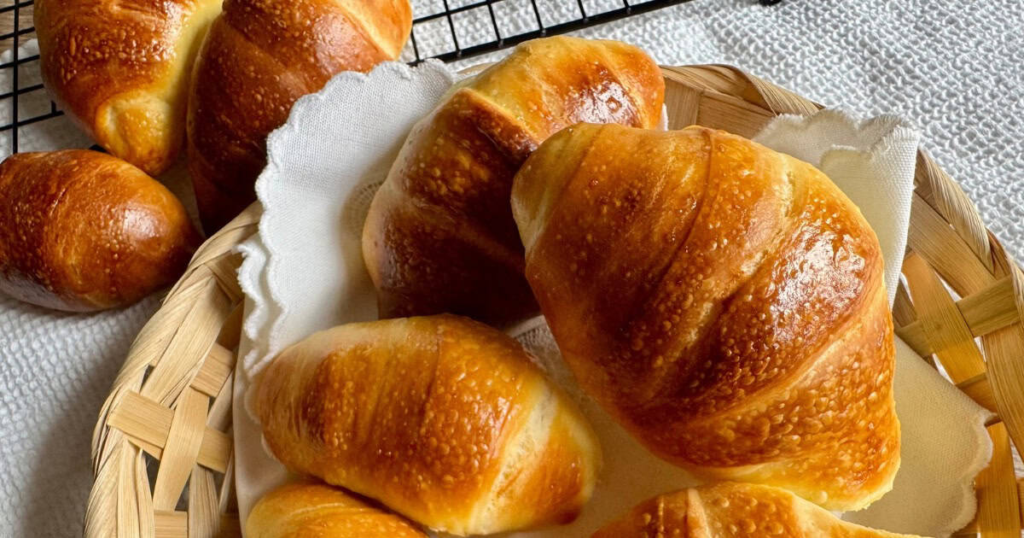
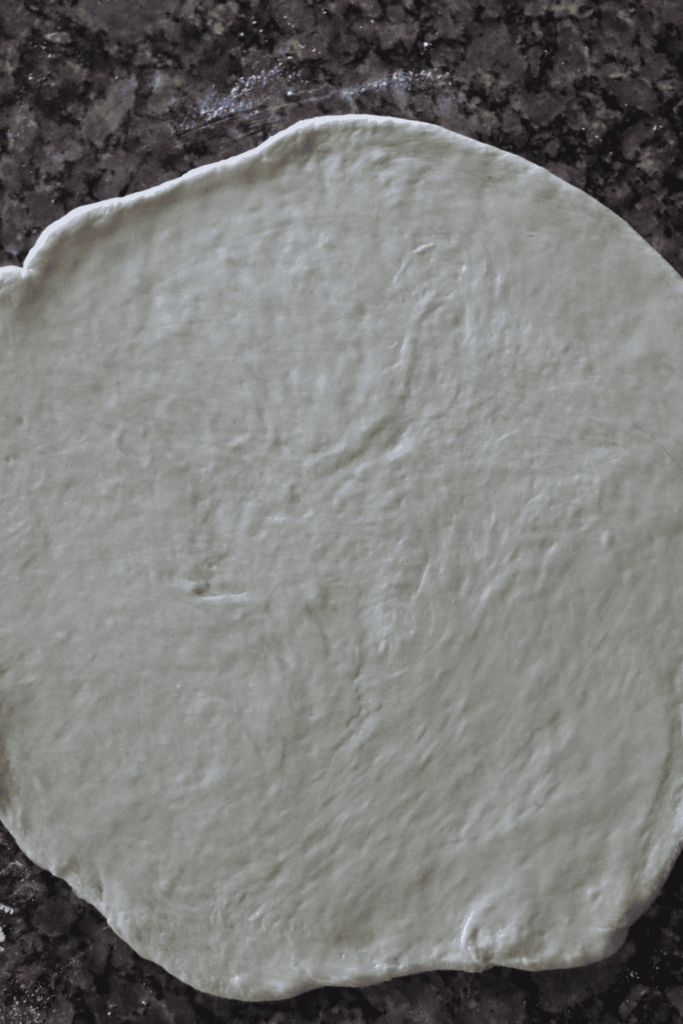
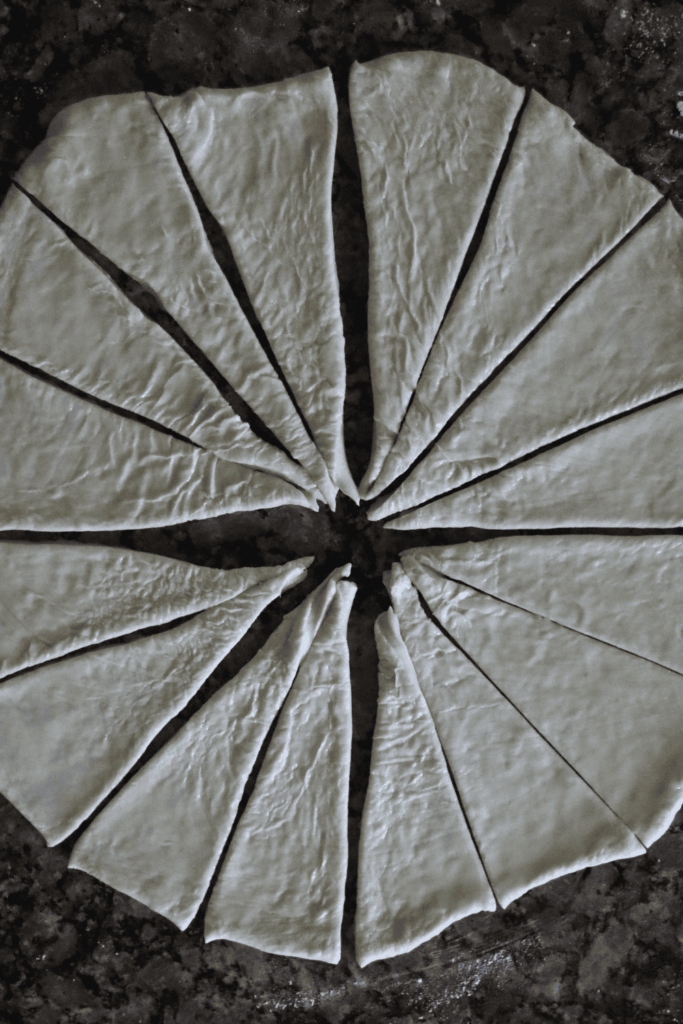
On a floured surface, roll out one of the dough balls into a 15-inch circle. With a pastry brush, brush melted butter on top of the dough. Then with a pizza cutter or sharp knife, divide the dough into 16 even wedges.
Tightly roll up each wedge, starting at the widest end, to form the crescent roll shape.
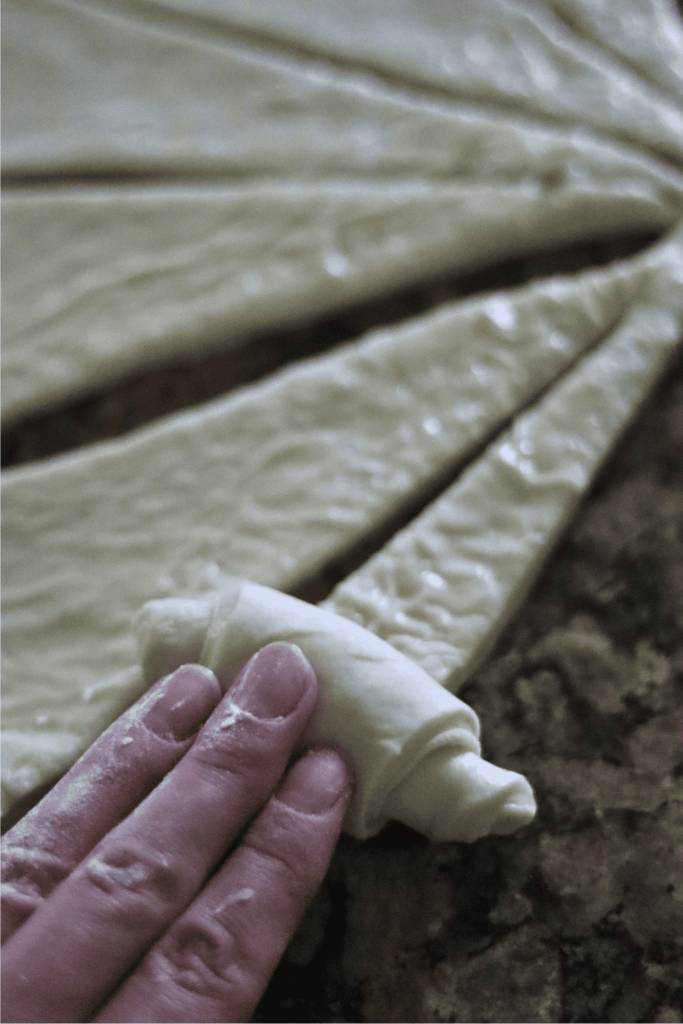
Repeat these same steps with the second dough ball.
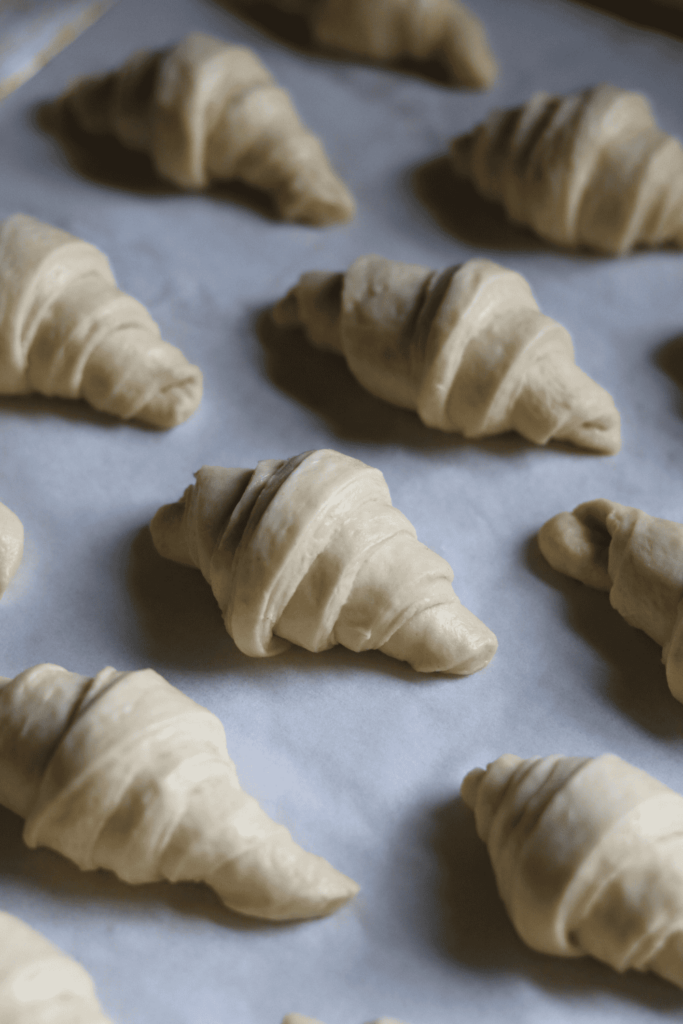
Place the shaped crescent rolls onto a baking dish lined with parchment paper, cover them with a plastic cover or plastic wrap, and let the dough rest for its second rise. In my 70-degree kitchen, this took about 2 hours. You will know the final proof is complete when the rolls have grown and look puffy.
Not ready to bake? No worries! Cover the unbaked rolls with a plastic cover or plastic wrap and store it in the fridge overnight. Before you’re ready to bake, pull the rolls out of the fridge and allow the dough to rise. The second rise will take longer since the dough is cold from the fridge. In my 70-degree F kitchen, the second proof took about 4 hours at room temperature after being in the fridge overnight.
A Time Saving Tip: Preparing these rolls for the holidays? Save yourself some time by preparing these rolls and freezing them! There are two ways you could do this: flash freeze the unbaked shaped rolls on a lined baking sheet. Once frozen solid, place the crescent rolls in a freezer safe bag for up to 3 months. When ready to bake, place the rolls on a lined baking sheet to thaw and proof before baking as normal. The time will depend greatly on the temperature of your kitchen.
Or, bake the crescent rolls, cool them to room temperature, and then freeze. When ready to eat, thaw at room temperature and warm slightly in the oven just before serving. They will taste as good as if you just baked them fresh!
Bake
Preheat the oven to 375 degrees F and bake for 14-16 minutes or until the tops are golden brown. Completely cooked rolls will have an internal temperature of 190 degrees F.
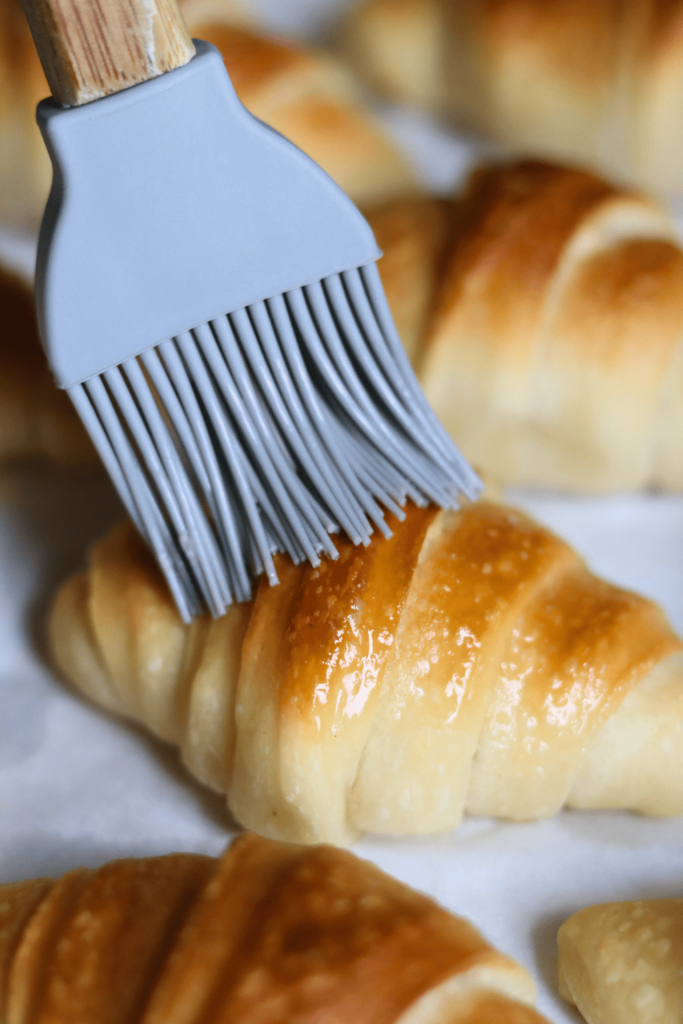
Remove the rolls from the oven and and let them rest for 10–15 minutes before topping with more melted butter. Serve warm and enjoy!
How to Serve:
Serve these sourdough crescent rolls warm from the oven for the ultimate experience the buttery layers are at their flakiest and most aromatic when fresh. Brush them with melted butter immediately after baking for an extra glossy finish and rich flavor. These versatile rolls pair beautifully with everything from holiday turkey and ham to weeknight chili or creamy soups. For breakfast or brunch, serve them alongside scrambled eggs, fresh jam, or honey butter. They also make excellent sandwich rolls try slicing them horizontally and filling with deli meats and cheese for quick lunch sliders. For an elegant touch at dinner parties, arrange them in a bread basket lined with a clean kitchen towel to keep them warm throughout the meal.
How to Store:
Room Temperature: Store cooled crescent rolls in an airtight container or resealable plastic bag at room temperature for up to 2 days. This keeps them soft while maintaining their texture.
Refrigerator: For longer storage, refrigerate the rolls in an airtight container for up to 5 days. The sourdough’s natural acidity helps preserve freshness.
Freezer: These rolls freeze beautifully for up to 3 months. Once completely cooled, wrap individual rolls tightly in plastic wrap, then place them in a freezer safe bag. Remove as much air as possible to prevent freezer burn.
Reheating: To refresh stored rolls, wrap them in aluminum foil and warm in a 300°F oven for 8-10 minutes. For frozen rolls, thaw at room temperature for 1-2 hours, then reheat. You can also microwave individual rolls for 15-20 seconds, though the oven method yields the best texture. Brush with melted butter after reheating to restore that fresh baked shine.

For More Guidance:
Why You’ll Love This Recipe:
Tastier Than Store Bought:
Say goodbye to those refrigerated tube rolls with their artificial aftertaste and one dimensional flavor. These homemade sourdough crescent rolls bring a subtle tangy complexity that store bought versions simply can’t match. The sourdough starter adds depth and character to every bite, while real butter creates layers of rich, savory flavor that tastes unmistakably homemade. Your kitchen will smell like an artisan bakery, and your family will notice the difference from the very first bite. Once you experience the superior taste of these from scratch rolls, it’s hard to go back to the packaged alternatives.
Soft on the Inside, Crispy on the Outside:
The magic of these crescent rolls lies in their irresistible texture contrast. Each roll features a pillowy soft, tender interior that pulls apart in delicate layers, while the outside bakes up golden brown with a satisfying, buttery crispness. The sourdough fermentation creates an exceptionally light crumb that stays moist and fluffy, while brushing with butter before baking ensures that gorgeous golden exterior with just the right amount of crunch. It’s the perfect balance that makes these rolls impossible to resist and even harder to eat just one.
Easy:
Don’t let the idea of making sourdough from scratch intimidate you. This recipe is designed for bakers of all skill levels, with straightforward steps and no complicated techniques required. There’s no laminating, no special equipment needed, and no tricky folding methods to master. The dough comes together quickly in one bowl, shapes easily into classic crescents, and bakes up beautifully every single time. Even if you’re new to working with sourdough, you’ll find this recipe remarkably forgiving and beginner friendly. Clear instructions guide you through each step, making homemade crescent rolls an achievable weekend baking project.
Same Day Recipe:
Forget about overnight rises and multi day timelines these sourdough crescent rolls can go from mixing bowl to dinner table in just one day. While traditional sourdough recipes often require lengthy fermentation periods, this streamlined version fits perfectly into your schedule. Start in the morning, and you’ll have fresh, warm rolls ready for dinner. The recipe respects your time without sacrificing that signature sourdough flavor, making it ideal for busy home bakers who want homemade quality without the wait. It’s proof that you can enjoy the benefits of sourdough baking even on your busiest days.
Frequently Asked Questions
Can I use all purpose flour instead of bread flour?
Yes, you can substitute all purpose flour for bread flour in this recipe using a 1:1 ratio. While both types of flour will produce delicious rolls, bread flour generally has a higher protein content, which creates more gluten, resulting in a slightly chewier texture and better rise. Using all purpose flour will give you a softer, more tender roll. For the best results, still knead the dough well, as this will help develop as much gluten as possible even with the lower protein flour.
How can I shape these sourdough crescent rolls into mini sourdough croissants?
For mini sourdough croissants, follow the same steps to prepare the dough, but divide it into smaller sections. Roll each ball of dough into a circle and cut it into smaller wedges for mini rolls. The lightly floured surface helps prevent sticking as you roll them up. Bake as directed, but check for doneness a few minutes earlier.
Happy baking!

Sourdough Crescent Rolls Recipe
Ingredients
- 113 grams 1/2 cup unsalted butter
- 240 g 1 cup milk
- 200 grams 1 cup active sourdough starter
- 1 egg room temperature
- 70 grams 1/3 cup sugar
- 450 grams 3 3/4 cups bread flour
- 9 grams 1 1/2 teaspoons salt
- 26 grams 2 Tablespoons unsalted butter **for brushing on top the dough
Instructions
Make the Dough
- Heat the butter and milk in a small saucepan on the stove or in a small bowl in the microwave until warm, but no warmer than 110 degrees F. If the liquid is hotter than 120 degrees F, it can kill the sourdough starter, which will prevent the dough from rising.
- 113g (1/2 c) unsalted butter, 240g (1 c) milk
- Meanwhile, add the bubbly sourdough starter, egg, and sugar to the bowl of a stand mixer with a paddle attachment. Mix on low speed until combined, then gradually add the warm milk and melted butter mixture while continuing to mix.
- This can also be done by hand.
- 200g (1 c) active sourdough starter, 1 egg, room temperature, 70g (1/3 c) sugar
- To the wet ingredients, add the flour and salt and mix again on low speed. Stop to scrape the sides of the bowl to incorporate all the dry ingredients, and then continue to mix on low for 1-2 minutes.
- 450g (3 3/4 c) 9g (1 1/2 tsp) salt
- The dough will look thick and sticky, like a cake batter. Cover with plastic wrap or what I like to use—a reusable shower cap—and allow the dough to rest for 30 minutes. This allows the gluten to rest before kneading.
Knead
- After 30 minutes, remove the cover and knead the dough on medium speed with the dough hook attachment for 15 minutes.
- This can also be done by hand. Knead for the same amount of time, or until the dough passes the windowpane test.
- You’ll know the dough has been kneaded completely when it is smooth and shiny. The dough will completely pull away from the sides of the bowl when it is being kneaded and it will pass the windowpane test.
- Baking Tip: This means when you stretch a small section of dough into a thin film, the light will be able to pass through without the dough tearing. If this is accomplished, the dough has been properly kneaded.
- Remove the dough and place it in a lightly greased bowl. I like to use butter or olive oil. Cover it again.
Bulk Fermentation
- Place the dough in a warm place in your kitchen and leave to double in size. In my 70-degree F kitchen, the first proof took an additional 3-4 hours. Note that the bulk fermentation time greatly depends on the temperature of your kitchen. If you have a colder kitchen, the rise time will take longer. If your kitchen runs warm, the first rise will take less time.
- A warm spot may be on top of your refrigerator, in a cabinet, or in an OFF oven with the light on.
Shape
- Once the dough has doubled in size, punch the top of the dough to remove all the air bubbles. Then, place the dough on a lightly floured work surface. Divide the dough equally in half, then roll each into a round dough ball.
- Cover with a clean tea towel and leave the dough to rest for 10 minutes; this allows the gluten to relax before rolling.
- On a floured surface, roll out one of the dough balls into a 15-inch circle. With a pastry brush, brush melted butter on top of the dough. Then with a pizza cutter or sharp knife, divide the dough into 16 even wedges.
- 26g (2 T) unsalted butter, melted & divided
- Tightly roll up each wedge, starting at the widest end, to form the crescent roll shape.
- Repeat these same steps with the second dough ball.
- Place the shaped crescent rolls onto a baking dish lined with parchment paper, cover them with a plastic cover or plastic wrap, and let the dough rest for its second rise. In my 70-degree kitchen, this took about 2 hours. You will know the final proof is complete when the rolls have grown and look puffy.
Not ready to bake?
- No worries! Cover the unbaked rolls with a plastic cover or plastic wrap and store it in the fridge overnight. Before you’re ready to bake, pull the rolls out of the fridge and allow the dough to rise. The second rise will take longer since the dough is cold from the fridge. In my 70-degree F kitchen, the second proof took about 4 hours at room temperature after being in the fridge overnight.
A Time-Saving Tip
- Preparing these rolls for the holidays? Save yourself some time by preparing these rolls and freezing them! There are two ways you could do this: flash-freeze the unbaked shaped rolls on a lined baking sheet. Once frozen solid, place the crescent rolls in a freezer-safe bag for up to 3 months. When ready to bake, place the rolls on a lined baking sheet to thaw and proof before baking as normal. The time will depend greatly on the temperature of your kitchen.
- Or, bake the crescent rolls, cool them to room temperature, and then freeze. When ready to eat, thaw at room temperature and warm slightly in the oven just before serving. They will taste as good as if you just baked them fresh!
Bake
- Preheat the oven to 375 degrees F and bake for 14-16 minutes or until the tops are golden brown. Completely cooked rolls will have an internal temperature of 190 degrees F.
- Remove the rolls from the oven and and let them rest for 10–15 minutes before topping with more melted butter. Serve warm and enjoy!
Notes
Baker’s Schedule
Same Day Bake
- 10 am: Make dough
- 10:30 am: Knead Dough
- 10:45 am: Continue Bulk Fermentation
- 2:45 pm: Shape
- 3 pm Second Rise
- 5 pm: Bake
- This schedule is made for a 68-70 degree environment. Higher temperatures will quicken the process. Lower temperatures will lengthen the process.
Two-Day Bake
- 5 pm: Make dough
- 5:30 pm: Knead Dough
- 5:45 pm: Continue Bulk Fermentation
- 9:45 pm: Shape & Place in Fridge Overnight
Next Day
- 2 pm Second Rise
- 6 pm: Bake

Cheese-Stuffed Sourdough Flatbread (Oozy Centers in 15!)