How to Make the Perfect Loaf of Bread (Easy Recipe)
Ever wondered how to make the perfect loaf right in your own kitchen? There’s nothing quite like the aroma of freshly baked bread golden and crusty on the outside, soft and fluffy on the inside. In this guide, we’ll walk you through an easy, step-by-step recipe that takes the guesswork out of bread baking. From choosing the right flour to mastering the perfect rise, you’ll learn everything you need to bake bakery-quality bread at home. Whether you’re a complete beginner or a seasoned baker looking to refine your technique, this recipe has you covered.
Learning how to make the perfect sourdough loaf takes patience rather than advanced skill. Each step teaches you how the dough behaves and how fermentation shapes the final result. With clear guidance and practice, sourdough baking becomes an enjoyable routine that leads to consistently delicious bread made right at home.
Pin for Later!
What is Sourdough?
Sourdough is one of the oldest forms of bread known to humanity. Unlike commercially produced breads that rely on store-bought yeast to rise, sourdough depends on a naturally fermented culture of wild yeast and lactic acid bacteria. This culture known as a sourdough starter is what gives sourdough its signature tangy flavor, chewy crumb, and crisp crust.
The fermentation process not only creates that beloved complex taste but also changes the structure of the bread at a nutritional level. It is a slow, intentional kind of baking and that is a big part of its charm.
Why Make Sourdough Bread?
With so many bread options available, one might wonder why sourdough is worth the extra effort. The answer comes in a few different flavors literally and figuratively.
Who Wants to Pass Up the Tangy Taste?
The flavor of sourdough is truly in a class of its own. That distinctive tang comes from the lactic and acetic acids produced during fermentation. Depending on the hydration of the dough, the temperature during fermentation, and the particular characteristics of the starter, the tanginess can be mild and subtle or bold and punchy.
That complex flavor profile is something a store-bought loaf simply cannot replicate. Once someone has tasted a real homemade sourdough, going back to commercial sandwich bread feels like a step backward.
Freshness
One of the most underrated benefits of homemade sourdough is how long it stays fresh. Thanks to the acids produced during fermentation, sourdough naturally inhibits the growth of mold, giving it a longer shelf life than most breads made with commercial yeast. A well-stored sourdough loaf can stay delicious for four to five days at room temperature, and even longer when frozen.
It’s a Healthier Option Compared to Regular Bread:
Sourdough is not just tastier than many commercial breads it is also notably better for the body. The long fermentation process breaks down phytic acid, an anti-nutrient found in grains, which makes the bread easier on the digestive system. This also increases the bioavailability of vitamins and minerals such as zinc, magnesium, and B vitamins.
Additionally, sourdough has a lower glycemic index compared to conventional bread, meaning it does not spike blood sugar as dramatically. For those who have always struggled with the dense, processed nature of store-bought loaves, giving sourdough a try is well worth it.
Sourdough Starter: The Key Ingredient:
Before a baker can bake any sourdough bread, they need one essential thing: an active sourdough starter. Everything else the shaping, the proofing, the baking flows from that one living ingredient.
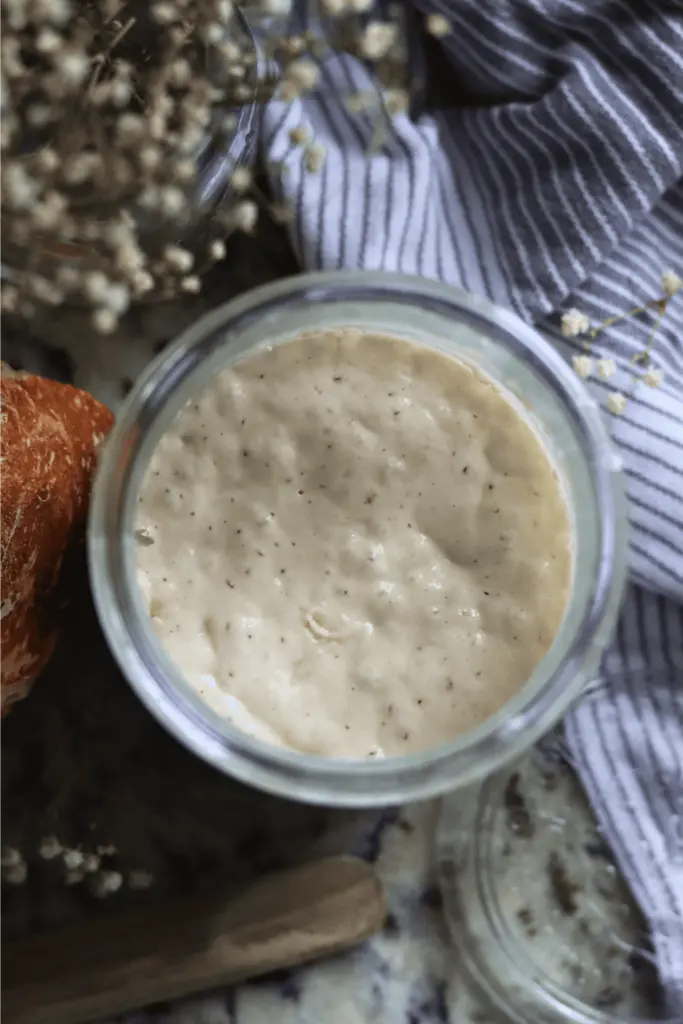
What’s a Sourdough Starter?
If someone is asking “what is sourdough starter?”, the simple answer is this: it is a mixture of flour and water that has been left to ferment naturally. Over time, wild yeast and beneficial bacteria from the environment and the flour itself colonize the mixture, creating a bubbly, active culture that can leaven bread without any commercial yeast.
A healthy sourdough starter is alive. It needs to be fed regularly with fresh flour and water to stay active and vigorous. A well-maintained starter can last for years even decades. Some bakers pass their starters down through generations like a cherished family heirloom.
Those wondering “where do you buy sourdough starter” may be surprised to learn that they can find one at specialty baking shops, online stores, or even receive one from a fellow baker. However, making one at home from scratch is surprisingly straightforward and deeply satisfying.
How to Make a Sourdough Starter: A Step-by-Step Guide
CFor those looking for a simple recipe for sourdough starter, here is a seven-day guide to building one from the ground up. Patience is the most important ingredient.
Ingredients:
- Whole wheat flour or rye flour (for the initial days) these contain more wild yeast
- All-purpose flour or bread flour (for ongoing feedings)
- Filtered or room-temperature water (chlorine can inhibit fermentation)
- A clean glass jar (at least 1-quart capacity)
- A kitchen scale (highly recommended for accuracy)
Day #1: Mix Your Starter
In a clean jar, combine 50g of whole wheat flour with 50g of room-temperature water. Stir vigorously until no dry flour remains. The mixture should have a thick, paste-like consistency. Cover it loosely with a cloth or lid placed on top without sealing, and leave it at room temperature (ideally between 70-75°F). Label it with the date and time.
At this stage, knowing how to make sourdough starter is mostly about patience there will not be much visible action yet.
Day #2: Check on Starter
Check on the starter and notice whether any tiny bubbles have begun to form on the surface or sides of the jar. Do not feed it yet just observe. Stir it once if desired, then cover it again. Some mild, slightly sour aromas may already be developing, which is a good sign.
Day #3: Watch for Bubbles; First Feeding
By Day 3, bubbles should be visible throughout the mixture. This is the first official feeding. Discard all but 50g of the starter (this is called discard). To the remaining starter, add 50g of all-purpose or bread flour and 50g of room-temperature water. Stir well, cover loosely, and let it rest.
This process of removing some of the starter and adding fresh flour and water is what makes sourdough starter recipes work it keeps the yeast from becoming overwhelmed and ensures consistent activity.
Day #4: More Activity
The starter should be showing more signs of life now more bubbles, a pleasant sour aroma, and possibly even some rising action. Feed again using the same method: discard all but 50g and add 50g flour plus 50g water. Mark the side of the jar with a rubber band or tape to track the rise over the next 8-12 hours.
Day #5-6: It’s Almost There
The starter is getting close. By Days 5 and 6, it should be rising predictably and falling back down between feedings. Continue feeding it once (or even twice) per day, always discarding first. The aroma should be pleasantly tangy and yeasty not unpleasant or overpowering.
If the starter is not quite there yet, do not panic. How long it takes to make sourdough starter depends largely on the ambient temperature and the type of flour being used. Warmer environments speed things up; cooler ones slow them down.
Day #7: Ready to Bake?
After seven days, the starter should be reliably doubling in size within 4-8 hours of a feeding, smelling pleasantly sour, and showing a consistent bubble pattern. To test readiness, drop a small spoonful into a glass of water if it floats (known as the float test), it is ready to bake with.
If it sinks, give it a couple more days of feedings and try again. A strong, active starter is the foundation of a great loaf, so it is worth the wait.

Troubleshooting Your Starter
Even with the best sourdough starter recipe, things do not always go smoothly. Here are some common issues and how to handle them.
Things Seem to Be Moving Too Slowly
If the starter does not seem to be developing bubbles or rising as expected, the environment might be too cold. Moving the jar to a warmer spot like the top of the refrigerator or near a warm appliance can help significantly. Alternatively, switching to a higher-proportion of whole wheat or rye flour during feedings can introduce more wild yeast and bacteria into the culture.
You’re Not Noticing Any Bubbles?
If there are no bubbles whatsoever after three or four days, there may be an issue with the water. Tap water that contains a high level of chlorine can inhibit yeast activity. Switching to filtered water or leaving tap water out overnight before using it often solves the problem. Another option is to make sure the jar is clean but not coated in soap residue, as this can also affect the starter.
The Starter is Weak or Not Growing
Sometimes the starter is alive but not vigorous enough to raise a loaf. Increasing the feeding frequency to twice a day morning and evening can help strengthen it. Switching to bread flour, which contains more protein and gluten structure, also tends to produce a more robust starter over time.
Flour Troubles
Not all flours are created equal. Bleached all-purpose flour tends to underperform because the bleaching process destroys some of the natural microbes in the flour. Unbleached all-purpose or whole grain flours are always the better choice when working on a sourdough bread starter recipe. If a specific brand of flour is causing issues, switching brands can sometimes make a surprising difference.
Preparing the Dough
Once the starter is active and ready, it is time to make the dough. This is where things really start to get exciting.
Ingredients:
- 450g bread flour (or all-purpose flour)
- 325g room-temperature water
- 100g active sourdough starter (fed 4-8 hours before use)
- 9g fine sea salt
Want to Make Your Own Sourdough Starter?
For those eager to get baking right away but who do not want to wait a full week to build a starter from scratch, there is good news: a sourdough starter kit can be a great shortcut. A sourdough starter kit typically includes a dehydrated or fresh starter culture that just needs to be activated with a few feedings before it is ready to use.
For those seeking the best sourdough starter kit available, specialty baking shops and online retailers carry a wide variety of options. Some kits even include the jar, a feeding schedule, and a flour sample to get started. Once the starter is active and ready, bakers can explore recipes like the 15 Best Sourdough Overnight Recipes for Beginners to put their new starter to work right away.
A sourdough bread starter kit is also a wonderful gift for any aspiring home baker it takes the guesswork out of the first step and gets them baking sourdough bread faster.
How to Mix the Dough
Mixing sourdough dough is a little different from conventional bread-making. There is no need for a stand mixer just hands, time, and a bit of technique.
Instructions:
Step 1: Mix the Dough
In a large bowl, combine the water and starter. Stir until the starter is fully dissolved into the water. Add the bread flour and mix until no dry flour remains. This shaggy, rough-looking mass is the beginning of the dough. Let it rest, uncovered, for 30-60 minutes. This resting period is called autolyse and it helps the flour absorb the water fully and the gluten begin to develop naturally.
After the autolyse, sprinkle the salt over the dough and incorporate it thoroughly by squeezing and folding the dough with wet hands until the salt is evenly distributed.
Step 2: Stretch-and-Fold
The stretch-and-fold technique is the backbone of developing gluten in sourdough without kneading. During the first 2-3 hours of bulk fermentation, perform a set of stretch-and-folds every 30 minutes. To do this, wet the hands, grab one side of the dough, stretch it upward until resistance is felt, then fold it over to the opposite side. Rotate the bowl and repeat on all four sides. This counts as one set.
Aim to complete 4-6 sets total. After each set, the dough should feel progressively smoother, stronger, and more elastic.
Step 3: Watch and Adjust
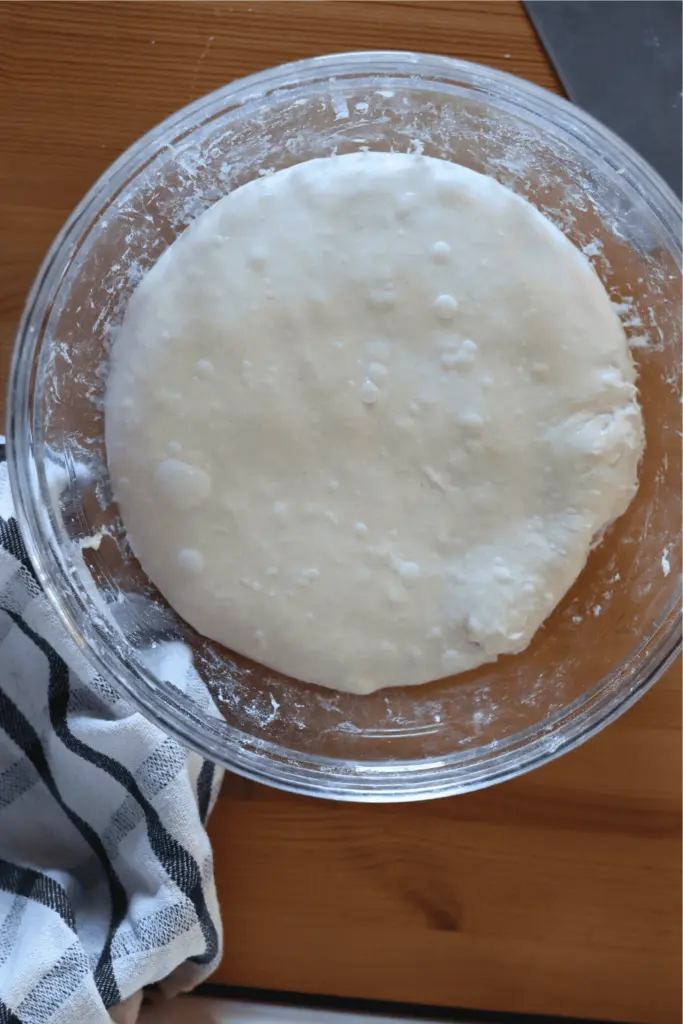
After completing the stretch-and-fold sets, leave the dough alone for the remainder of the bulk fermentation period. During this time, keep an eye on how the dough is responding. It should gradually increase in volume, become more relaxed, and develop a slightly domed surface with visible bubbles on the sides and surface.
Every kitchen is different, so adjusting the timing based on observation is key. A warmer kitchen means faster fermentation; a cooler one means the process will take longer.
Dough Hydration
Dough hydration refers to the ratio of water to flour in the recipe, expressed as a percentage. The recipe above uses approximately 72% hydration (325g water divided by 450g flour). This is a moderately high hydration that produces an open crumb without being unmanageably sticky for a beginner.
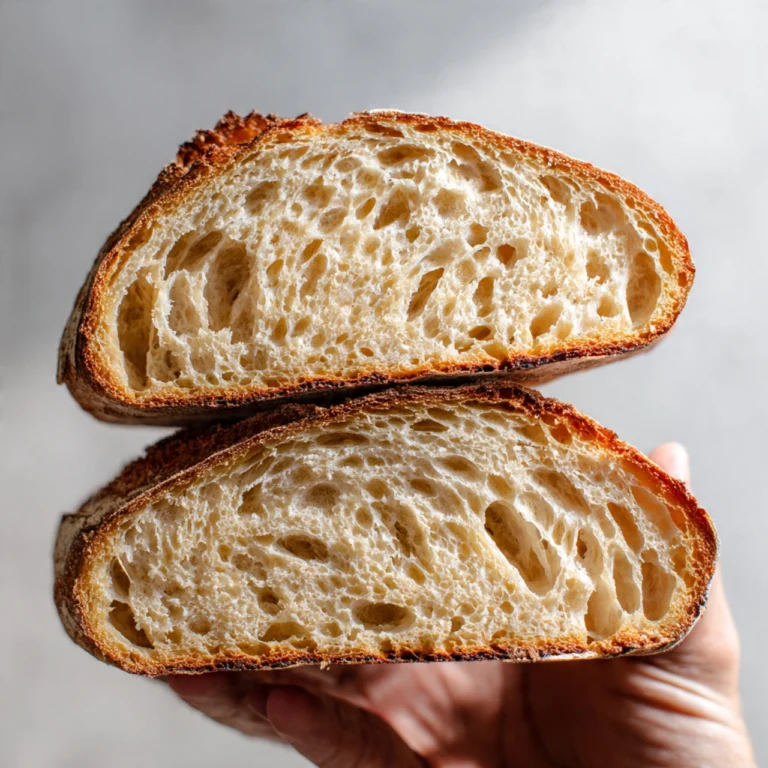
How Hydration Affects Dough Texture
Lower hydration doughs (60-65%) are easier to handle, shape, and tend to produce a tighter crumb. They are a great starting point for complete beginners. Higher hydration doughs (75-85%) produce the large, irregular holes often seen in artisan sourdough, but they are significantly stickier and harder to manage.
For beginners, starting at 70-75% hydration is usually the sweet spot. As confidence grows, gradually increasing the water content is a natural next step.
Bulk Fermentation: The First Rise
Bulk fermentation is the period after mixing when the dough ferments as a whole before being shaped. It typically lasts anywhere from 4-12 hours depending on the temperature of the kitchen and the strength of the starter.
During bulk fermentation, the wild yeast in the starter is working hard to produce carbon dioxide, which gets trapped in the gluten network and causes the dough to rise. Meanwhile, the bacteria are producing the acids that give sourdough its flavor.
The dough is ready to shape when it has increased in volume by 50-75%, feels airy and slightly jiggly when the bowl is shaken, and shows bubble activity on the surface and sides.
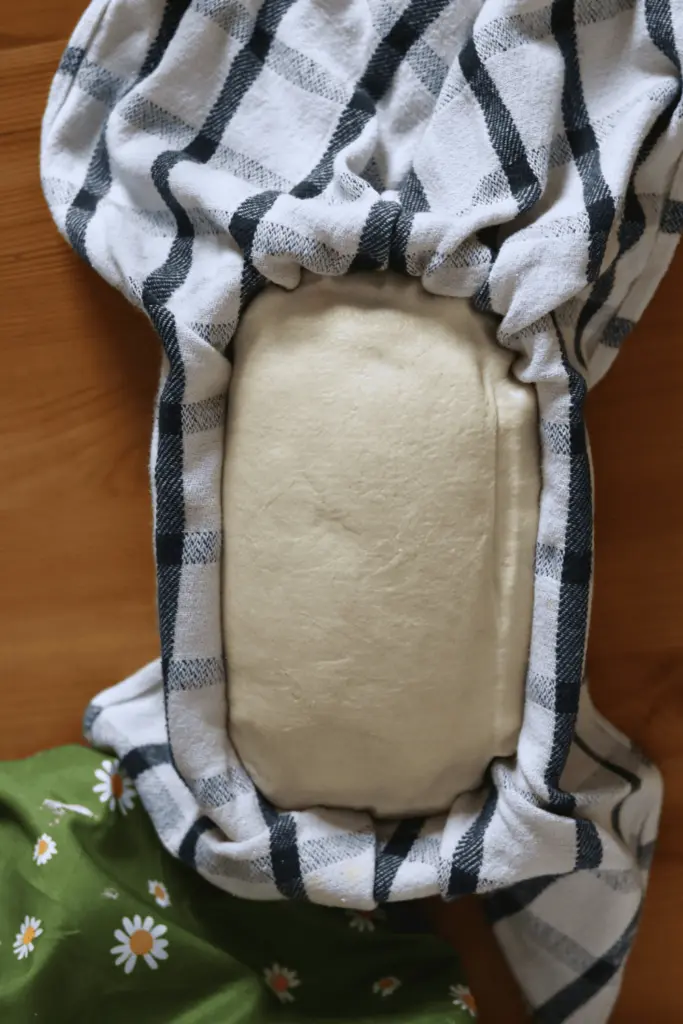
How to Use a Proofing Basket
A proofing basket also known as a banneton is a woven basket used to support the shaped dough during its final rise. It helps the loaf hold its shape and gives it that beautiful spiral or ring pattern on the surface.
To prepare a proofing basket, dust it generously with a mixture of rice flour and all-purpose flour. Rice flour is particularly helpful because it does not absorb moisture and ensures the dough releases cleanly after proofing. Place the shaped dough into the basket smooth-side down, cover it loosely, and let it proof.
Shaping the Dough
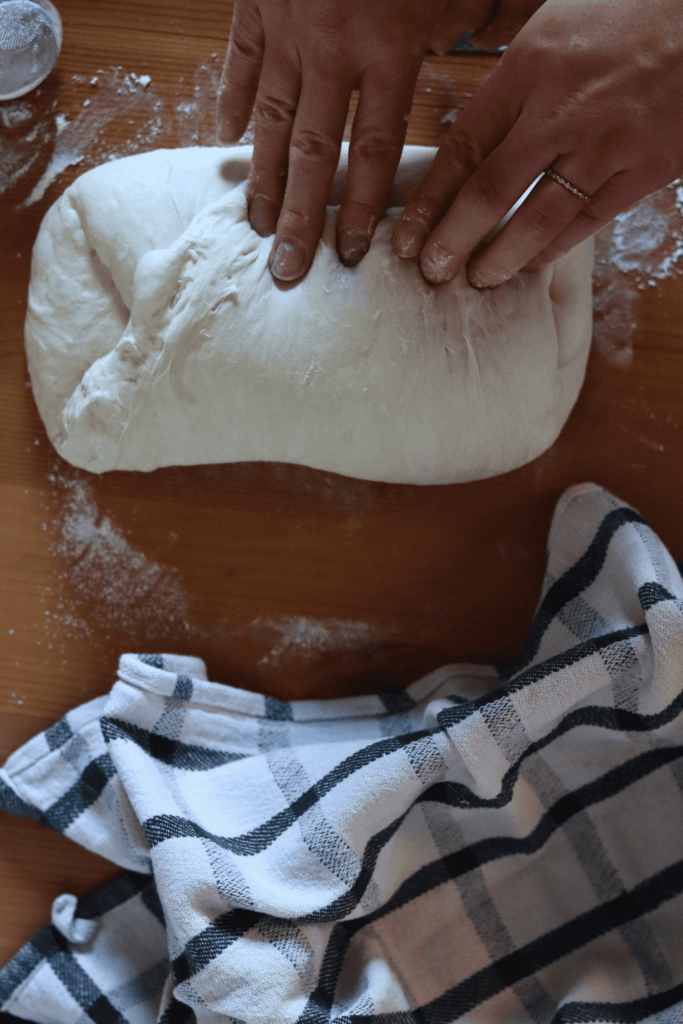
Before shaping, give the dough a gentle pre-shape to build some surface tension. Then let it rest for 20-30 minutes before doing the final shape. This short rest allows the gluten to relax enough that the dough can be shaped without tearing or fighting back.
How to Shape Your Dough
After your dough has gone through its bulk fermentation, it’s time to shape it. You’ll want to gently stretch and fold the dough to build surface tension. This gives the dough strength and helps it rise evenly as it bakes.
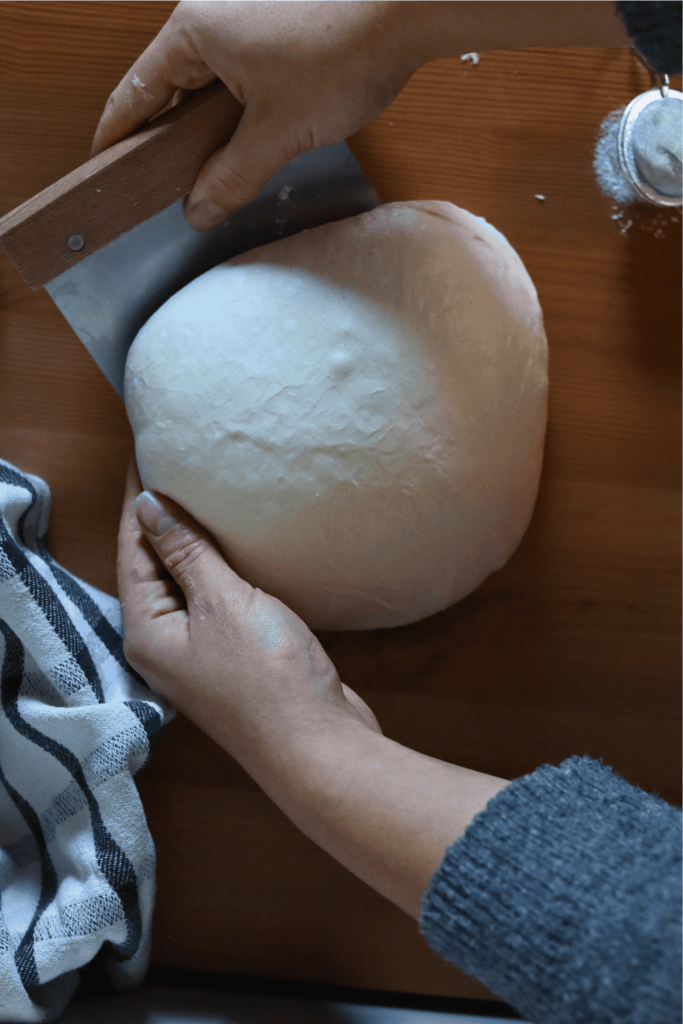
Pre-Shape
To pre-shape, gently turn the dough out onto an unfloured surface. Using a bench scraper and the hands, fold the edges of the dough toward the center, then flip it over so the seam is on the bottom. Using the bench scraper and the cupped hands, drag the dough ball toward the baker in a circular motion to build tension on the surface. Let it rest seam-side down for 20-30 minutes.
Dough Shaping Styles
There are two main shapes used for sourdough:
Boule (Round Loaf): To shape a boule, gently stretch the dough into a rough rectangle, then fold the sides toward the center, followed by the top and bottom. Flip it over and use the hands to rotate and drag the dough ball to build tension on the surface. Place it seam-side down into the proofing basket.
Batard (Oval Loaf): A batard is shaped similarly to a boule but elongated. After folding the dough, use the hands to roll and taper the ends slightly before placing it seam-side down into an oval banneton.
Handling Sticky Dough
Sticky dough is one of the most common challenges beginners face and it can be genuinely frustrating. The key is to resist the urge to add more flour. Adding too much flour will make the bread dense and dry.
Instead, keep the hands lightly wet when handling the dough. A bench scraper is an invaluable tool here it allows the dough to be moved and shaped without sticking to the hands. Working quickly and confidently also helps, as hesitation allows the dough to stick more.
If the dough is extremely sticky, it may be a sign that the bulk fermentation has gone on too long or that the dough is over-hydrated. Reducing the water by 10-15g in the next attempt often makes a significant difference.
Final Proof: The Second Rise
After shaping and placing the dough into the proofing basket, the final proof begins. This is the second and last rise before baking. It can take place at room temperature for 2-4 hours or in the refrigerator overnight (known as a cold ferment).
The purpose of the final proof is to allow the dough to recover from the stress of shaping and build up one more round of gas and flavor before baking.
Cold Ferment
Cold fermenting the dough in the refrigerator overnight is one of the most popular techniques in sourdough baking and for good reason. Slowing down fermentation at a low temperature allows the flavor to develop more deeply, making the bread noticeably more complex and tangy.
It also makes scheduling much easier. Bakers can shape the dough in the evening, pop it in the fridge, and bake it fresh the next morning. Cold-fermented dough can typically be held in the refrigerator for 12-18 hours, and some experienced bakers even go up to 36 hours for an exceptionally flavorful loaf.
Another advantage of cold fermenting is that cold dough is much easier to score before baking.
Signs Your Dough is Ready to Bake
Knowing when the dough is fully proofed and ready for the oven takes a little practice. Here are the signs to look for:
- The dough has increased in size noticeably typically by 50-75% from its post-shaping volume.
- When gently poked with a floured finger, the indentation springs back slowly but not completely. If it springs back instantly, it needs more time. If it does not spring back at all, it may be over-proofed.
- The surface looks slightly domed and feels airy, with visible bubbles close to the surface.
- After cold fermenting, the dough should feel firm but not tight, and the surface should look smooth.
Baking Sourdough
Now comes the most exciting part: baking. Getting the oven set up correctly makes a significant difference in the final result.
Baking Basics: Oven Temperature and Steam
When baking sourdough, getting the oven temperature and steam right makes all the difference. Here’s what you need to do:
Preheat Your Oven to 500°F
Preheating the oven thoroughly for at least 45-60 minutes is crucial for getting the best oven spring and crust development. Sourdough needs intense heat from the very first moment it hits the oven.
Dutch Oven:
If using a Dutch oven (the most recommended method for home bakers), place the Dutch oven inside the oven during the preheat so it gets blazing hot. A hot Dutch oven acts like a professional deck oven, providing an enclosed environment with trapped steam.
Regular Oven:
For those baking on a baking stone or sheet pan, place the stone or pan on the middle rack and a separate shallow pan on the bottom rack during preheating. This bottom pan will be used to create steam.
Creating Steam:
Steam is critical in the first 15-20 minutes of baking. It keeps the outer crust of the dough pliable and allows the loaf to spring up as high as possible before the crust sets. Without steam, the crust hardens too quickly, restricting oven spring and resulting in a denser, less impressive loaf.
Dutch Oven:
When baking in a Dutch oven, the lid traps the steam naturally released from the dough. Bake with the lid on for the first 20-25 minutes, then remove the lid for the final 15-20 minutes to develop a deep brown, crackling crust.
Regular Oven:
When baking without a Dutch oven, create steam by pouring about a cup of boiling water or a handful of ice cubes into the preheated bottom pan immediately after loading the bread into the oven. Close the door quickly to trap the steam inside.
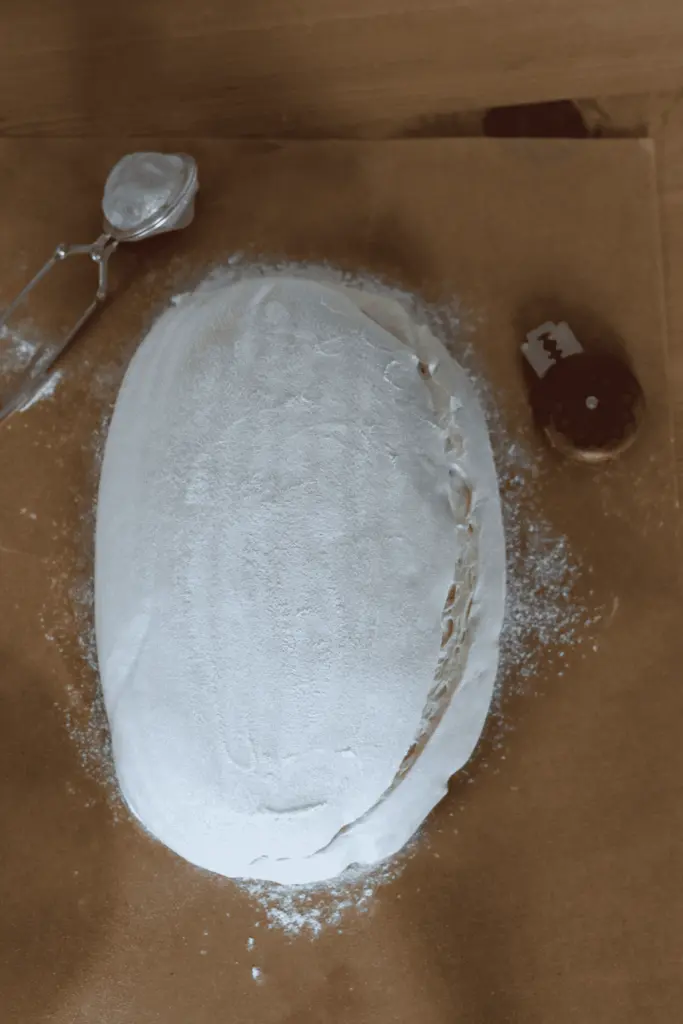
Scoring the Dough:
Scoring is the process of making cuts in the surface of the dough just before it goes into the oven. This controls where the bread expands and prevents it from bursting in unexpected places. It also creates the beautiful, artistic patterns seen on artisan loaves
How to Score Your Dough
Use a sharp bread lame (a specialized scoring tool) or a razor blade for clean, decisive cuts. A sharp knife works in a pinch but tends to drag and tear the dough. Here are some tips:
- Score confidently and quickly hesitation causes the blade to drag.
- For a classic single-score, hold the blade at a 30-45 degree angle and make a firm, swift arc across the top of the loaf.
- For more decorative patterns (wheat stalks, leaves, spirals), work quickly and score all marks before the dough starts to deflate.
- Cold dough from the refrigerator scores more cleanly and crisply.
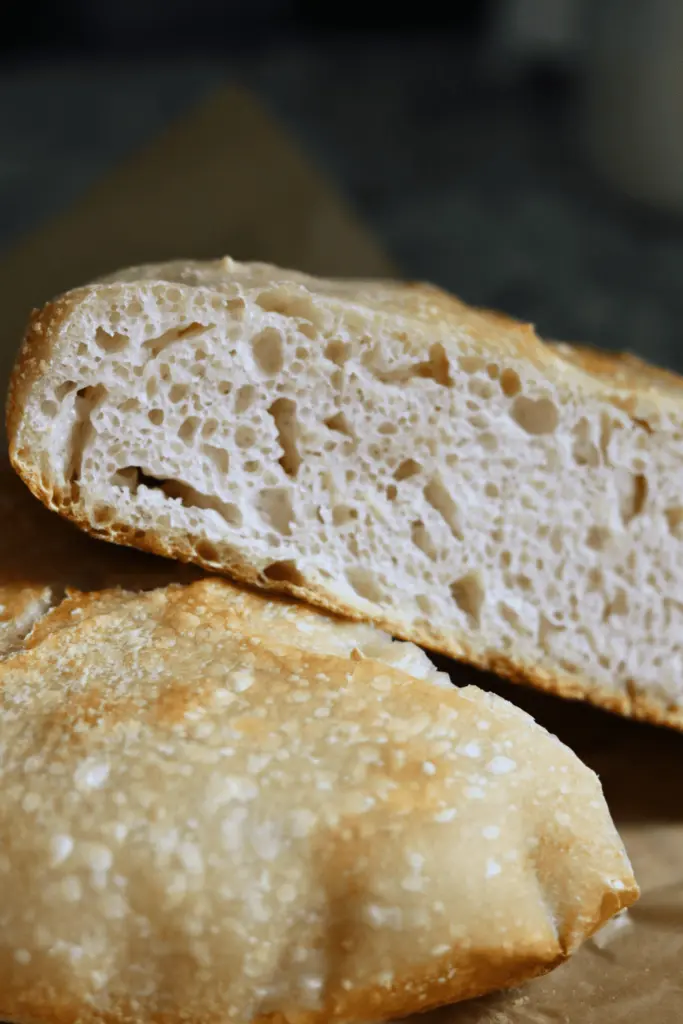
Baking the Bread: Step-by-Step Instructions
- Remove the shaped dough from the refrigerator (if cold fermenting) and flip it out onto a piece of parchment paper. Score the top immediately.
- Carefully remove the preheated Dutch oven from the oven (using thick oven mitts). Lift the dough by the parchment paper and lower it into the Dutch oven.
- Place the lid on the Dutch oven and bake at 500°F (or 475°F for a slightly lighter crust) for 20-25 minutes.
- Remove the lid and continue baking for another 15-20 minutes until the crust is a deep, rich brown color.
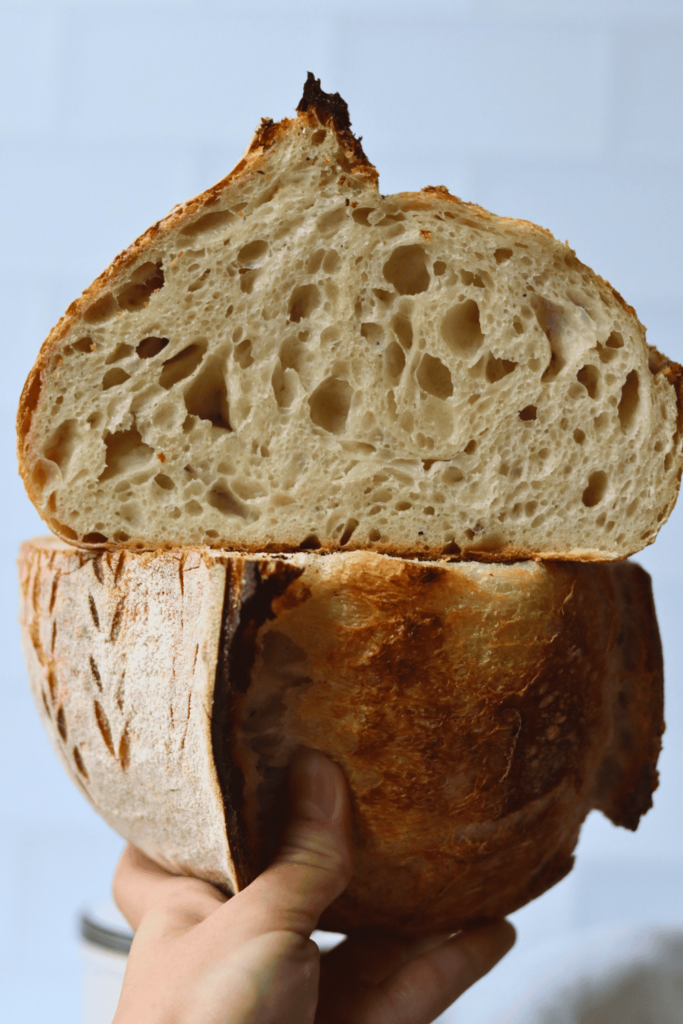
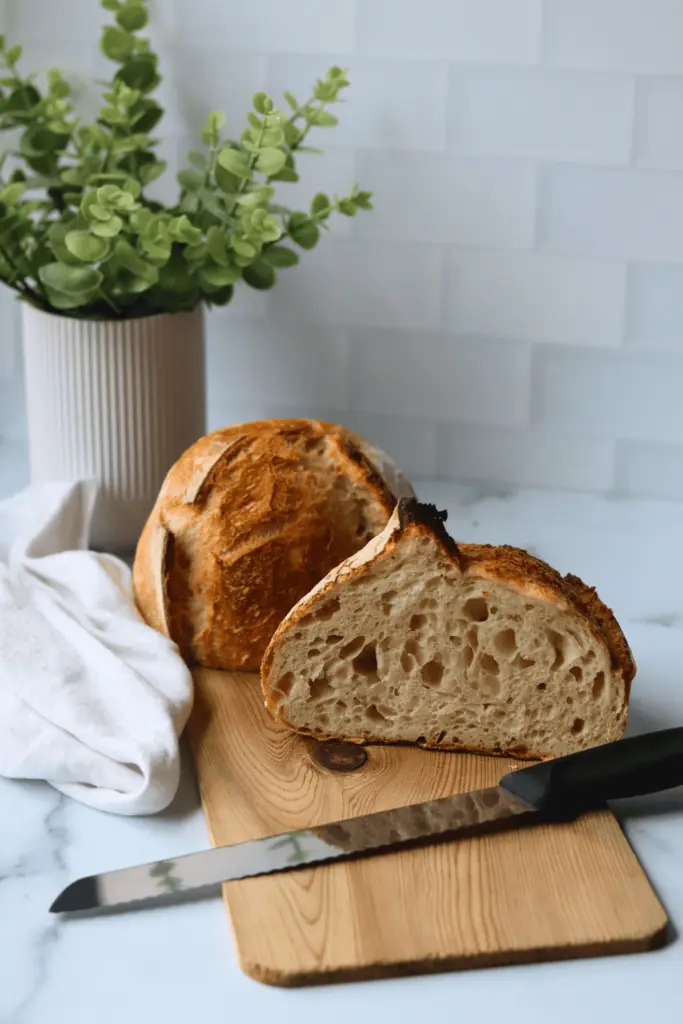
- Remove the loaf from the Dutch oven and place it on a wire rack. Let it cool for at least 1 hour before slicing. Cutting into it too soon will result in a gummy crumb, as the internal structure is still setting.
Once mastered, exploring more creative variations is a natural next step. The jalapeno and cheddar sourdough bread recipe at bakingstarter.com is a fantastic way to take sourdough flavor to a whole new level.
Jalapeño and Cheddar Sourdough Bread Recipe
Troubleshooting Your Sourdough Loaf
Even experienced bakers run into issues from time to time. Here is a breakdown of the most common sourdough problems and their solutions.
Why Is My Loaf Flat?
A flat loaf is usually the result of one of three issues: an underactive starter, under-proofed dough, or over-proofed dough. First, confirm the starter was truly active and doubling reliably before baking. If the dough was left to proof at room temperature for too long, it may have run out of energy. Always use the poke test to check the dough before baking, and make sure the oven and Dutch oven were fully preheated.
Why Is My Crumb Too Dense?
Dense crumb is one of the most frequent complaints from sourdough beginners. It often points to insufficient fermentation either the bulk fermentation or the final proof was cut short. It can also indicate that the starter was not active enough, or that too much flour was added during shaping. Allow more fermentation time in the next bake and resist the urge to rush the process.
Why Is My Loaf Too Sticky or Wet?
Stickiness inside the baked loaf is almost always caused by slicing the bread too early. The interior of sourdough remains gummy and wet until the crumb has fully set during cooling which can take up to 2 hours. If the loaf still seems too wet after proper cooling, reducing the hydration by 10-15g in the next bake is recommended.
Why Is My Crust Too Hard or Thick?
An overly thick or hard crust is usually a result of too much dry heat late in the baking process. Lowering the oven temperature from 500°F to 450°F during the uncovered phase can help. Brushing a little water on the loaf just before the uncovered bake also softens the crust slightly. Wrapping the warm loaf in a clean kitchen towel while it cools softens the crust further.
Storing Your Sourdough
Room Temperature Storage
Sourdough keeps best at room temperature rather than in the refrigerator. The refrigerator actually accelerates staling by causing the starches to retrograde more quickly. Store a cut loaf cut-side down on a cutting board, or wrap it in a beeswax wrap or clean cloth. Avoid plastic bags, as they trap moisture and soften the crust.
Tips:
- Slice only what is needed and store the rest as a whole loaf for as long as possible.
- A bread box is one of the best investments for anyone who bakes regularly.
- Room temperature sourdough stays fresh for 3-5 days.
Freezing Bread for Longer Storage
Sourdough freezes exceptionally well. To freeze, allow the loaf to cool completely, then slice the entire loaf. Place the slices in a freezer-safe bag, squeezing out as much air as possible. Frozen sourdough slices can be stored for up to 3 months without significant quality loss.
Reviving Sourdough From the Freezer
Reheating Sliced Bread:
Pull individual slices directly from the freezer and toast them in a toaster or toaster oven no thawing necessary. The result is a slice that tastes almost like freshly baked bread.
Reheating a Whole Loaf:
To revive a frozen whole loaf, preheat the oven to 375°F and bake the unwrapped, frozen loaf directly on the oven rack for 25-30 minutes until heated through and the crust is crispy again.
Thawing:
If thawing at room temperature, leave the bread in its bag to allow moisture to redistribute evenly. Once fully thawed (2-3 hours), remove it from the bag and let the crust breathe for 10-15 minutes before slicing.
FAQ About Beginners Sourdough Bread
What is sourdough, and how is it different from regular bread?
Sourdough is bread made with a natural fermentation process using a starter that ferments naturally with wild yeast and lactic acid bacteria. The starter is a mix of flour and water that captures wild yeast and bacteria. Unlike regular bread that uses commercial yeast, sourdough rises slower, has a tangy flavor, and a chewy texture. It also stays fresher longer without the need for artificial preservatives.
What is a sourdough starter?
A sourdough starter is a live culture made from flour and water that ferments and creates wild yeast.
How can I tell if my starter is ready to bake with?
Your starter is ready when it doubles in size within 4–6 hours of feeding, though this can vary depending on room temperature and feeding ratio. Look for bubbles on the surface and a tangy or yeasty smell. A simple way to test it is the float test. Drop a teaspoon of active, bubbly starter into water. If it floats, it’s likely ready to bake, but keep in mind the float test isn’t foolproof. Overly bubbly or underdeveloped starters can sometimes float too.
What type of flour should I use for my starter and dough?
For starting a new sourdough starter, whole wheat or rye flour works best because it ferments quickly and encourages the growth of wild yeast. Once your starter is established, you can switch to unbleached all-purpose or bread flour for baking. These flours have higher gluten content, which helps give your dough structure and allows it to rise properly.
Why didn’t my dough rise properly?
There could be a few reasons for this. A weak starter, under-proofing, or low hydration might be the issue. First, check that your starter is active and bubbly before using it. Your dough should rise in a warm spot, around 75-80°F. Also, give the dough enough time to rise during bulk fermentation. Fermentation time can vary based on room temperature and dough hydration, so keep an eye on the dough’s progress. If any of these steps are off, the dough may not rise as expected.
How do I know if my dough is fully proofed?
To check if your shaped dough left at room temperature for the second proof is ready to bake, gently press your finger into it. If the indentation springs back slowly, it’s good to go. A quick bounce-back means it needs more time, while no spring-back at all indicates the dough is likely over-proofed and may turn out too dense.
What’s the best way to shape sourdough dough?
Stretch and fold the dough a few times, then shape it into a tight round. Creating surface tension while shaping helps the dough keep its form and rise well during baking. Be gentle but firm to avoid deflating it.
Why does my sourdough loaf have a dense crumb?
A dense crumb usually results from under-proofing, over-proofing, not enough hydration, or missing some key kneading and folding steps. Be sure to properly bulk ferment and proof your dough, adding more water for a higher hydration dough, or folding the dough more during bulk fermentation to help it develop better structure and air pockets.
How can I make my sourdough crust crispier?
If you want a crispier crust, bake your sourdough in a Dutch oven or a covered baking dish to trap steam. That’s what gives it that golden, crunchy exterior. About halfway through baking, take the lid off so the crust can brown and crisp up. When it’s done, let the bread cool all the way before slicing. Cutting into it too soon can make the crust go soft, so hold off until it reaches room temperature for the best results.
What’s the best way to store sourdough bread?
Store sourdough in a paper bag or wrap it in a clean kitchen towel at room temperature for up to 3 days. Plastic bags can make the crust soft, so it’s best to skip those. For longer storage, slice the loaf and freeze the pieces. When you’re ready to eat, just pop a slice in the oven to bring back that crispy crust
How do I handle sticky dough?
Sourdough dough can be sticky due to its high hydration. To handle it more easily, wet your hands slightly before working with it. You can also use a bench scraper to move and shape the dough without it sticking.
What temperature should I bake sourdough at?
Preheat your oven and Dutch oven to 500°F of at least 30 minutes, reduce the oven temperature to 450°F and bake the sourdough with the lid on for the first 27 minutes. After that, lower the temperature to 425°F, remove the lid, and continue baking for another 10–15 minutes, or until the crust is deep golden brown.
Can I make sourdough without a Dutch oven?
Yes, you can! Use a baking stone or sheet pan, and place an oven-safe dish filled with hot water on the lower rack to create steam. You can also spray water into the oven during the first 10 minutes of baking to help with the rise and crust.
How can I prevent my loaf from sticking to the proofing basket?
Generously dust the proofing basket with rice flour. Why rice flour? It works better than regular wheat flour at preventing the dough from sticking because it is gluten-free. If you don’t have rice flour on hand, line the basket with a kitchen towel and dust it with regular flour instead. This will help keep the dough from sticking and make it easier to transfer.
What should I do if my sourdough tastes too sour?
If your sourdough is too sour, try shortening the cold-proof time or feeding your starter more often to balance the flavor. You can also use more unbleached white flour, like all-purpose or bread flour, instead of whole wheat, as it tends to produce a milder taste.
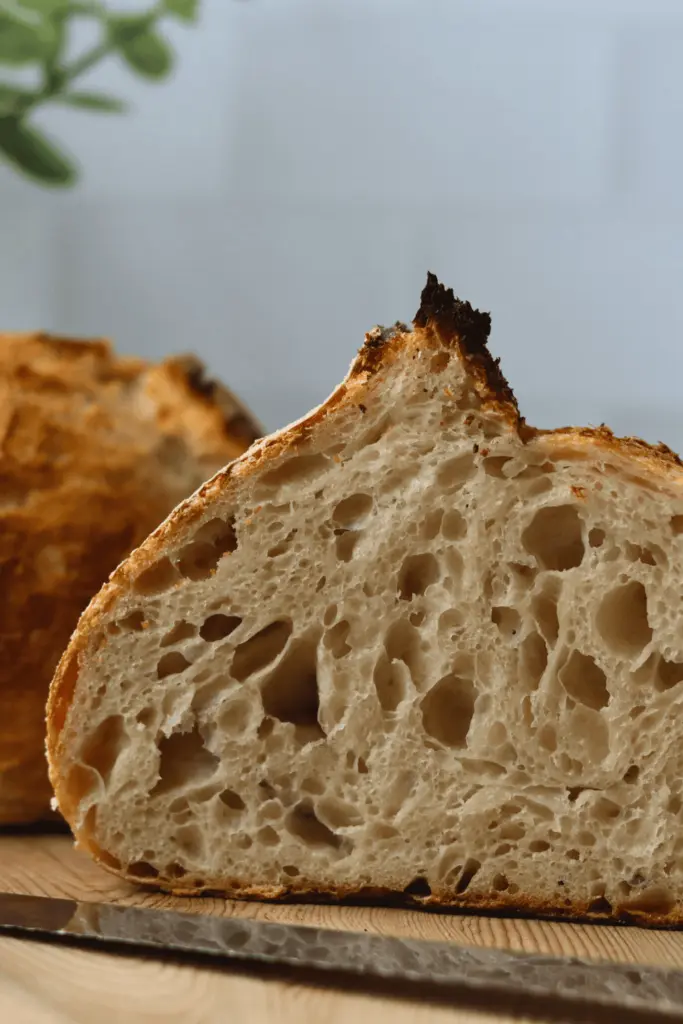
Why does my sourdough have large holes or uneven texture?
Large holes or uneven texture usually happen if the dough is under-proofed, too hydrated or not mixed enough. Press out some of the air bubbles while shaping the dough, then let it proof until it’s fully ready. That should help even things out.
How do I get the scoring marks to stand out more?
Chill your dough in the freezer for 30–60 minutes before scoring. It’ll firm up, making it easier to get clean, sharp cuts. Use a razor blade or lame for the best results, and try scoring at a deeper angle for more noticeable marks.
What’s the difference between bulk fermentation and final proofing?
Bulk fermentation is the first rise, right after you mix the starter into your dough. During this stage, the dough develops structure and flavor. Final proofing happens after you shape the dough. It’s when the dough gets a second rise, allowing it to relax and expand before baking.
How do I know if I’ve over-proofed my dough?
Over-proofed dough will feel super airy and might deflate easily when you touch it. You may also notice large bubbles on the surface. The dough will often feel super sticky and wet. If this happens, try gently reshaping the dough and baking it right away. It might not rise as much in the oven, but it should still taste great.
Can I make sourdough gluten-free?
Yep, you can! You’ll need a gluten-free starter, which you can make with flours like brown rice or sorghum. The process is pretty similar to regular sourdough, but gluten-free dough might need a bit more tweaking, like adjusting hydration levels and baking times. It may take some trial and error to get the texture and flavor just right.
What tools do I need to make sourdough at home?
Helpful tools include a kitchen scale, mixing bowls, a bench scraper, a proofing basket or bowl with a towel, a Dutch oven or baking stone. A razor blade or a bread lame (a tool specifically for scoring) is the best choice because they’re sharp and give you clean, precise cuts.
How do I fix a flat loaf?
Flat loaves often happen because of weak starters or over-proofing. The best way to fix a flat sourdough loaf is to focus on feeding your starter regularly and giving the dough a proper fermentation time. Shaping tightly and preheating the oven also help.
How can I make sourdough bread with a lighter crust?
Bake at a slightly lower temperature for a longer time. If you are using a Dutch oven, you can also keep the lid on for longer.
What can I do with leftover sourdough starter?
Use extra starter in pancakes, waffles, muffins, crackers, or even pizza dough. It adds flavor and reduces waste.
How do I maintain my starter long-term?
Feed the starter weekly if it’s in the fridge. For longer storage, you can dehydrate your starter. Spread it thin on parchment paper, let it dry, crumble it up, and store it in an airtight container.
Glossary
Bench rest: A quick break for the dough after shaping. It gives the gluten time to relax before shaping it again.
Bulk fermentation: The first big rise after mixing. This is when the dough gets its flavor and structure.
Crumb: The texture inside the bread. It can be light and airy or tight and dense.
Dough hydration: The amount of water compared to flour in the dough, shown as a percentage. More water means a softer, more open crumb.
Fermentation: The magic that happens when yeast and bacteria make bubbles and acids, helping the dough rise and taste amazing.
Levain: A mix of starter, flour, and water that acts as the yeast to make the dough rise.
Oven spring: That quick puff the dough gets during the first few minutes in the oven when the heat makes it expand fast.
Proofing: The final rise after shaping. This is the last step before baking to let the dough fluff up.
Scoring: Slashing the top of the dough right before baking. It controls how it expands and adds a cool design.
Sourdough starter: A mix of flour and water that captures wild yeast and bacteria. This is what makes sourdough rise naturally.
Stretch and fold: A simple way to strengthen dough by stretching it out and folding it over itself during the rise.
Tangy: The slightly sour flavor sourdough is known for. It comes from the acids produced during fermentation.
Wild yeast: Yeast that naturally exists in the air and flour. It’s what powers the rise in sourdough starter.
Windowpane test: A quick check for gluten development. Stretch a piece of dough until it’s thin and see-through without tearing.
Retardation: A cold-ferment slows down the rise by sticking the dough in the fridge. This makes the flavor stronger and the structure better.
Score lines: Decorative cuts on top of the dough made right before baking. They look nice and help the dough rise evenly.
Starter feeding: Refreshing your sourdough starter with new flour and water to keep it active and strong.
Apple Cider Sourdough Donut Quick Bread